
This document explains, step by step, how to create a custom template with the Message Template Tool and send a message to yourself with the REST API Test Tool.
| Category | Details |
|---|---|
| What you will learn | Send a feed message that includes a header, image, title, button, and user name to your Kakao Talk My Chatroom (Preview the result→) |
| Prerequisites | Log in with a Kakao Developers account |
You can compose a Kakao Talk message with a default template or a custom template. See Compare configuration methods for the differences between the two methods.
This tutorial uses a custom template, which you create with the Message Template Tool.
See Template types for the available message template types.
In this tutorial, you compose a Feed A type template.
Before sending a message with the Kakao Talk Message API, complete the app settings required for Kakao Login and message sending.
- Integrate Kakao Login.
- Configure the Send Kakao Talk Message consent item.
- The recipient must consent to the
talk_messageconsent item.
You need a Kakao Developers app to use Kakao APIs. See Create a Kakao Developers app and create an app to use.
- Select the app to use on the app management page.
- Go to [Kakao Login] > [General] and activate Kakao Login.
- In [App] > [Platform Key] > [REST API key], register a Kakao Login Redirect URI.
Consent item settings screen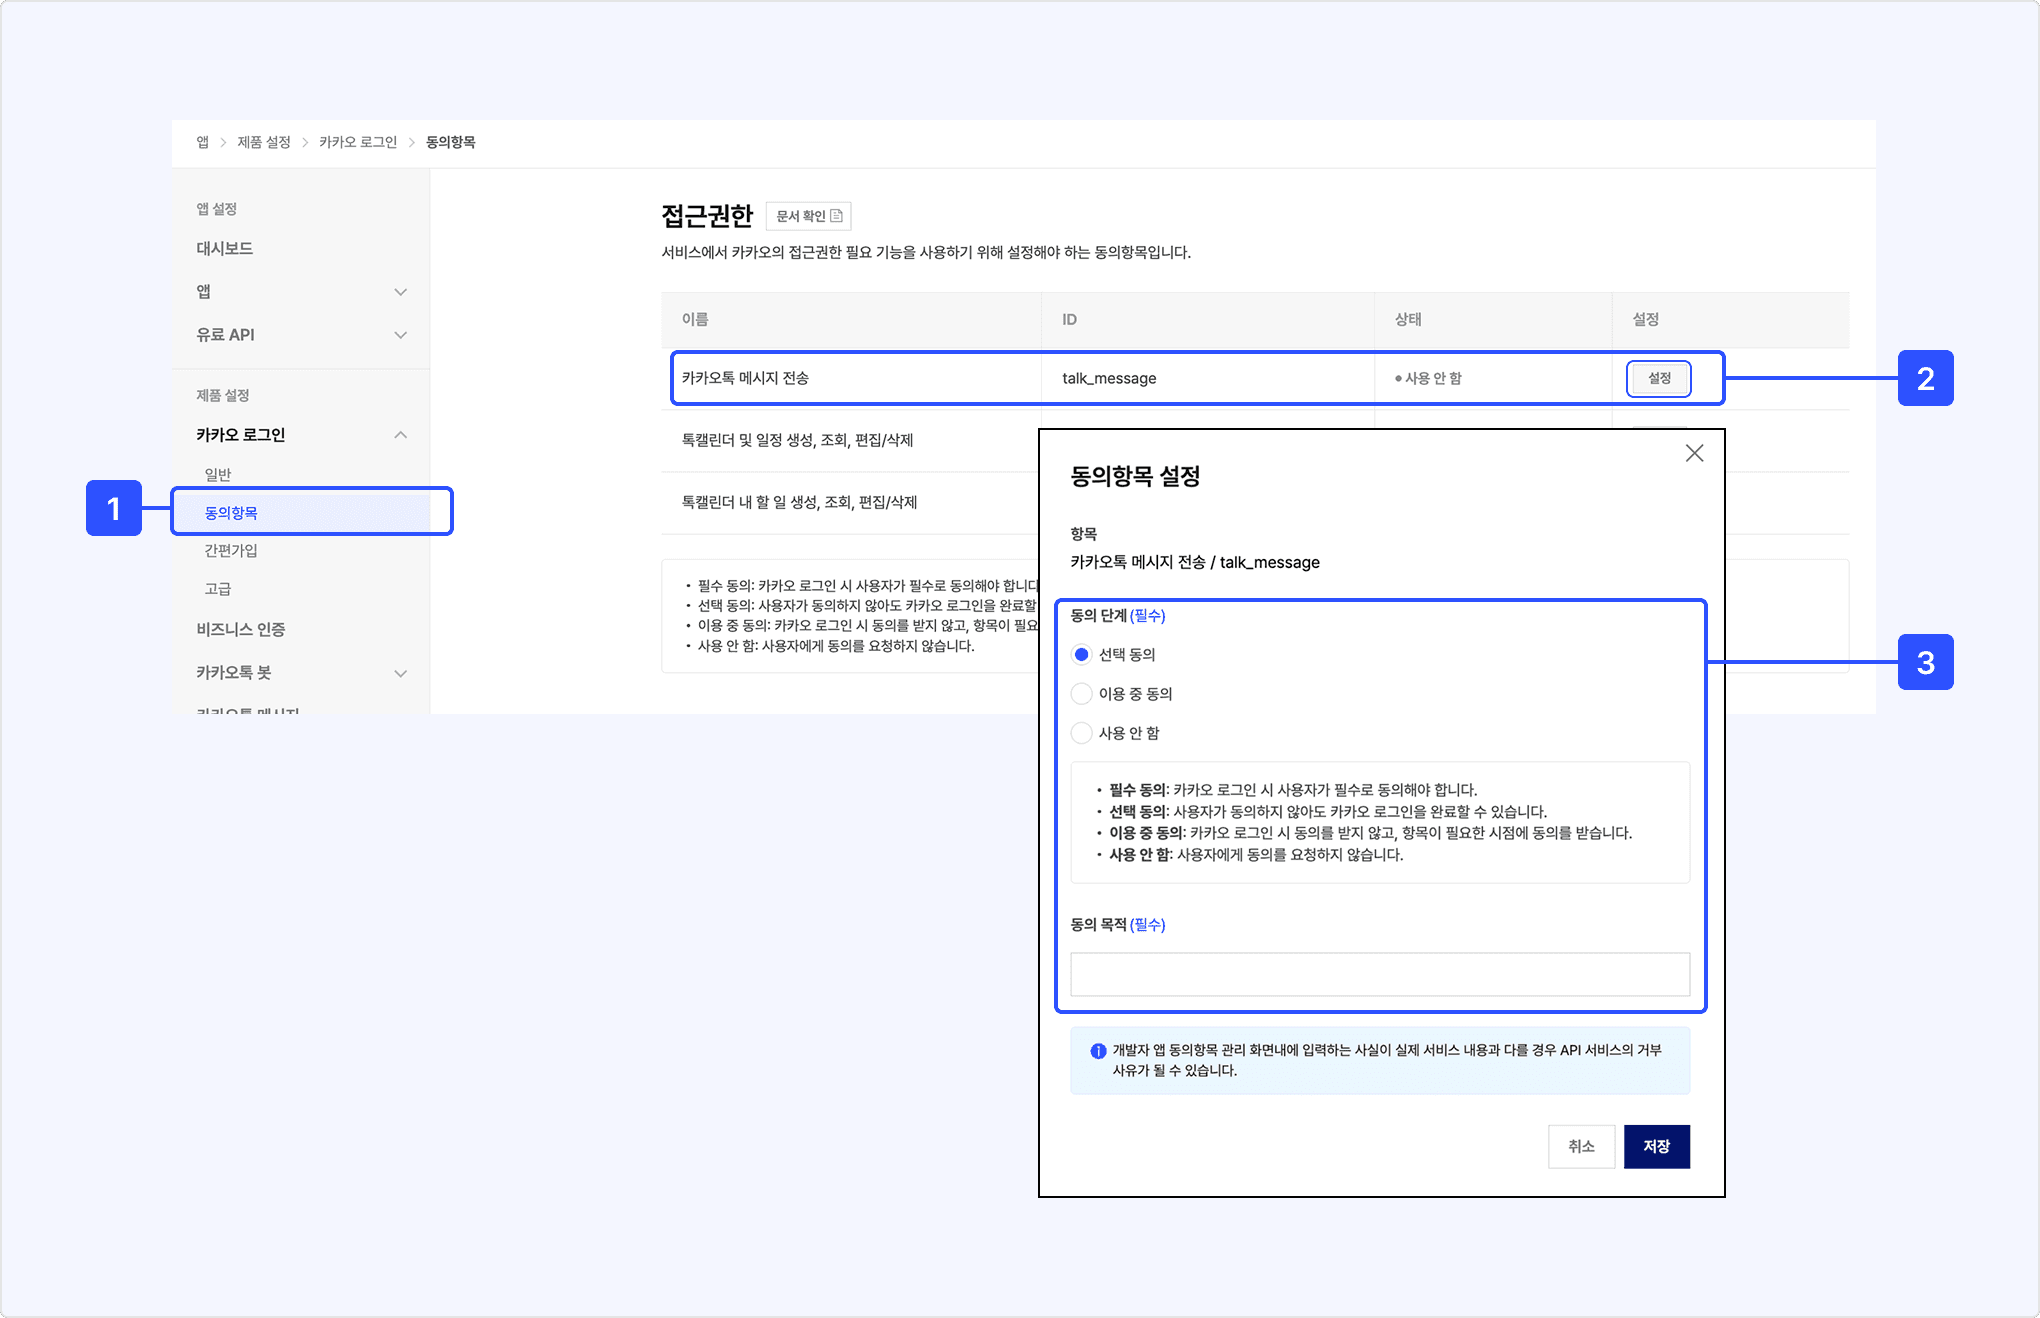
- On the app management page, go to [Kakao Login] > [Consent Items].
- Under [Access permission], select [Settings] for [Send Kakao Talk Message].
- Select either [Optional consent] or [Consent during use] as the consent level, and enter the purpose of consent.
- Select [Save].
You can use only domains registered in the app for web links included in messages. Message sending may fail if you use an unregistered domain as a message link.
- On the app management page, go to [App] > [Product Link].
- Under [Web domain], select [Register web domain].
- In the [Register web domain] window, register the website domain to open from the message.
- The first web domain you register becomes the [default web domain].
You cannot directly edit the value designated as the default web domain. Add another domain, change the default web domain, and then edit or delete the existing domain.
- Select [Edit domain].
- Select [+] and register another web domain.
- Select [Select default domain] to designate the newly added domain as the default web domain.
- Select [Edit domain] again to edit or delete the existing domain.
In this step, create a new template in the Message Template Tool and check the template ID.
- In [Tools] > [Message Template], select the Developers app to use for sending the message.
- Select the [A] [Add Message Template] button.
- Select [Feed (A)] for the template type, and then select [OK].
- In [C] Template title, enter a name or description that identifies the template. (Optional)
- Select the [D] [Save] button to save the message template.
- Check the [E] Template ID. You need this value when sending a message to yourself.
Create message template screen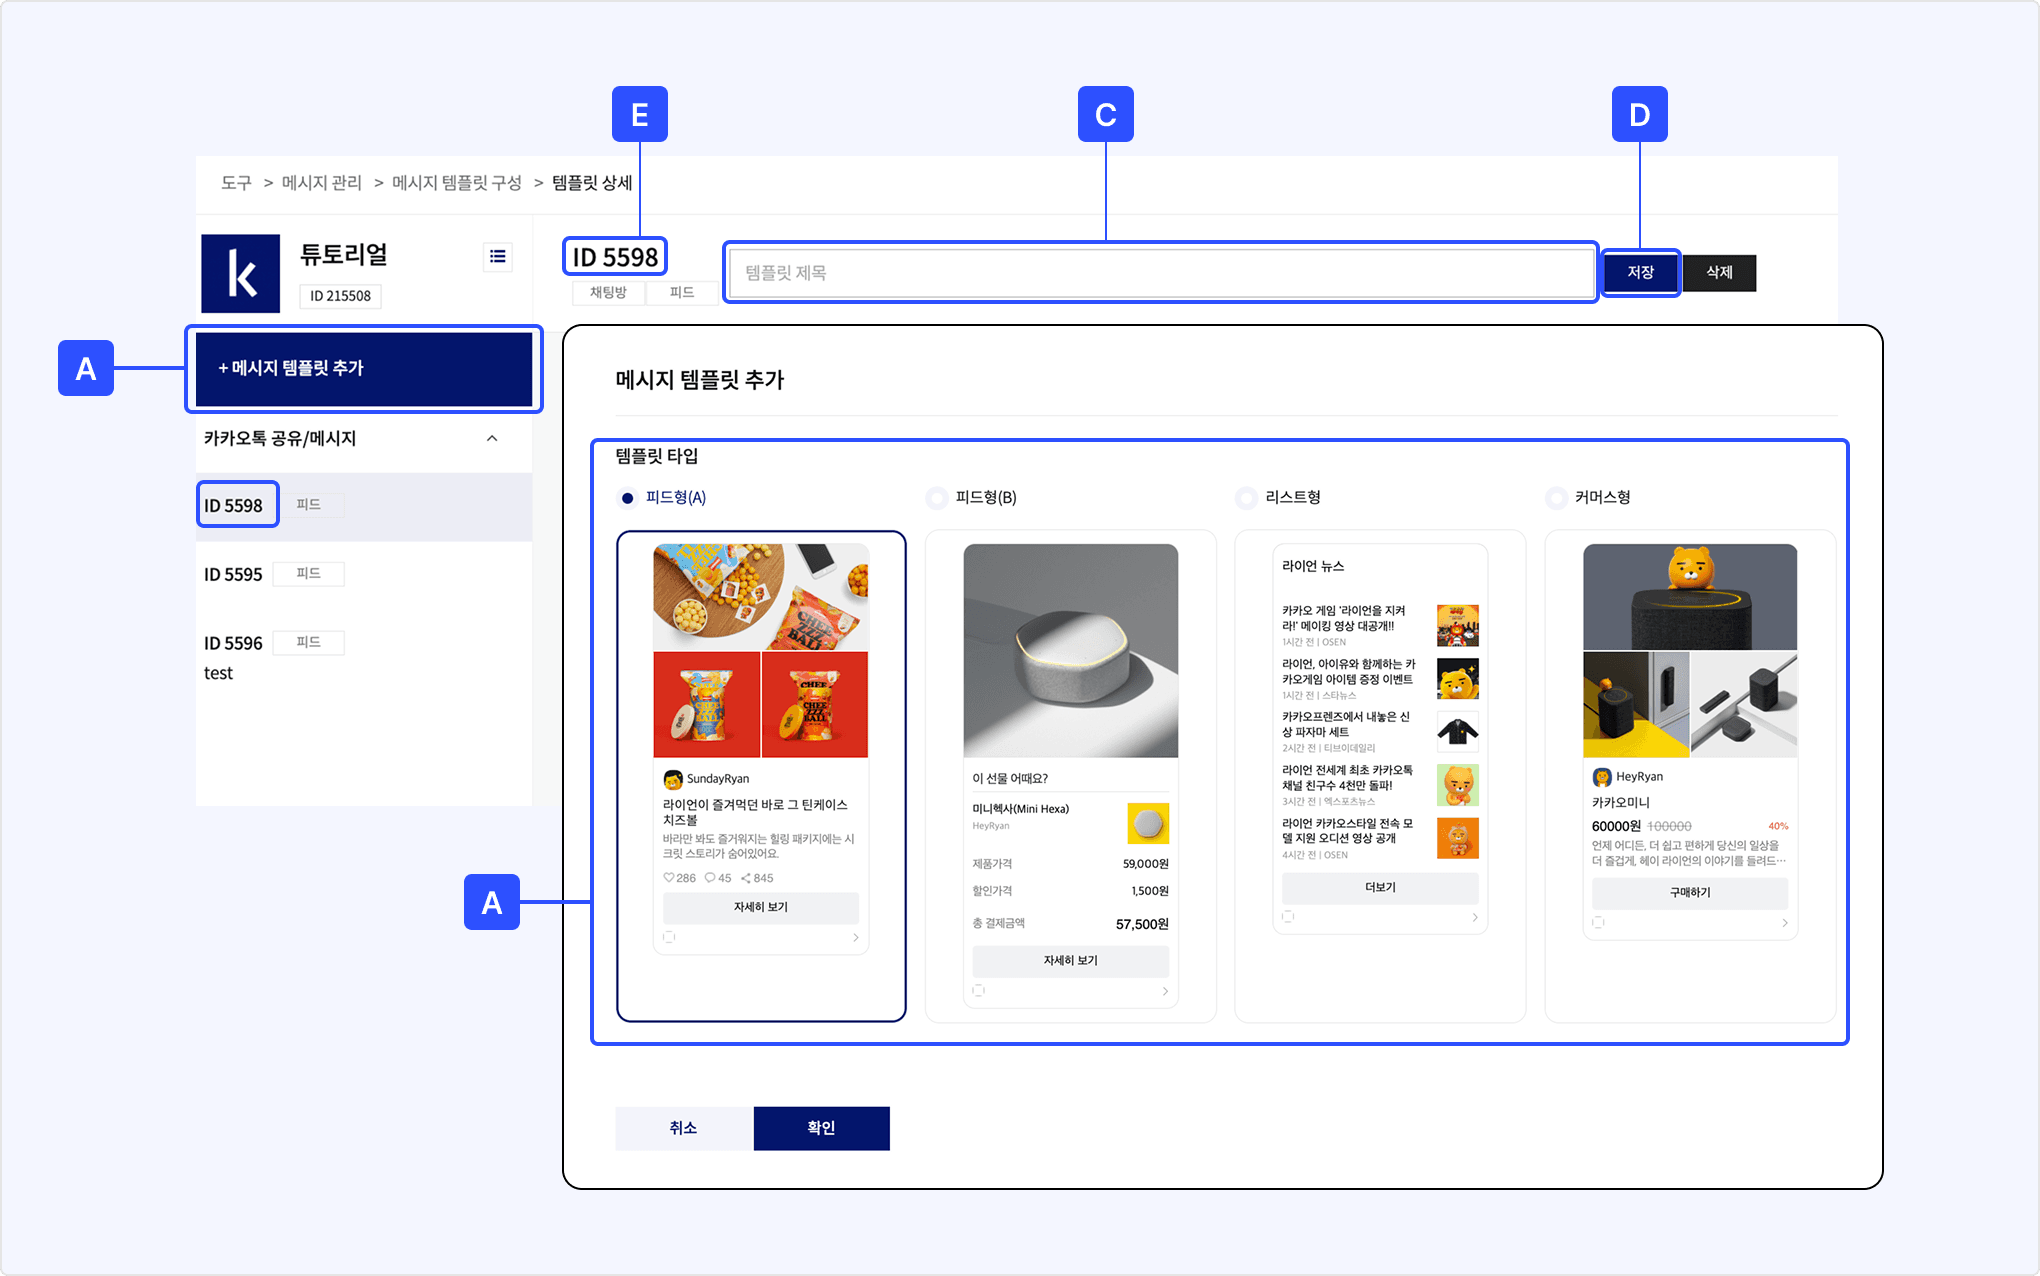
Configure the image, header, title, body, and button of the feed message.
- In [Purpose] under Common settings, select [Kakao Talk Message API].
- Set Header to [ON], and then enter a title.
- [Header name]:
Recommendation for ${NAME} - Note: You cannot use both a header and a profile in Feed A type. This tutorial uses only a header.
- [Header name]:
- In Image, upload the image to display in the message.
- In Message Title / Content, enter the following:
- [Message title]:
Today's recommended content - [Content]:
This is a Kakao Developers message template test.
- [Message title]:
- In Button, change the button name to one you want.
- Select [Save].
When you enter ${NAME} in the template, NAME is registered as a user argument. When sending a message, pass the NAME value in template_args to display different text for each user.
Configure links for clickable areas such as the message image, title, and button. You cannot configure links unless you register a web domain.
After you register a web domain, [Mobile web] and [PC web] are set to [ON] by default under [Common link]. Clickable areas without individual links open this common link.
You can apply different links to clickable components such as buttons, images, the message title/content, and the header.
To apply a link other than the common link to a component, select Set individual links under [Link settings] for the component. See Component link settings for details.
To apply different links based on the user environment, such as mobile/PC web, Android, or iOS, [set individual links] under Component link settings in the Message Template Tool.
In this tutorial, you configure individual links for the Button component that open different pages on mobile web and PC web.
- Under [Button] > [Link settings], select [Edit].
- In the [Link settings] window, select [Set individual links].
- Set [Mobile web] and [PC web] to [ON].
- Under [Web domain], select [Default web domain].
- [A] Default web domain: Default web domain designated in [App] > [Product Link] > [Web domain]
- [B] Web domain value: Domain registered in [App] > [Product Link] > [Web domain]
- [C] User argument: Replaced with the default web domain value if the registered domain is not passed as a user argument
- Enter paths that apply differently to mobile and PC.
- [Mobile web] > [Path]: Enter
/m/today. - [PC web] > [Path]: Enter
/today.
- [Mobile web] > [Path]: Enter
- Check the full links under [Link preview].
- Select [Edit].
- Select [Save] at the top of the Message Template Tool to save the changes.
Link settings > Set individual links screen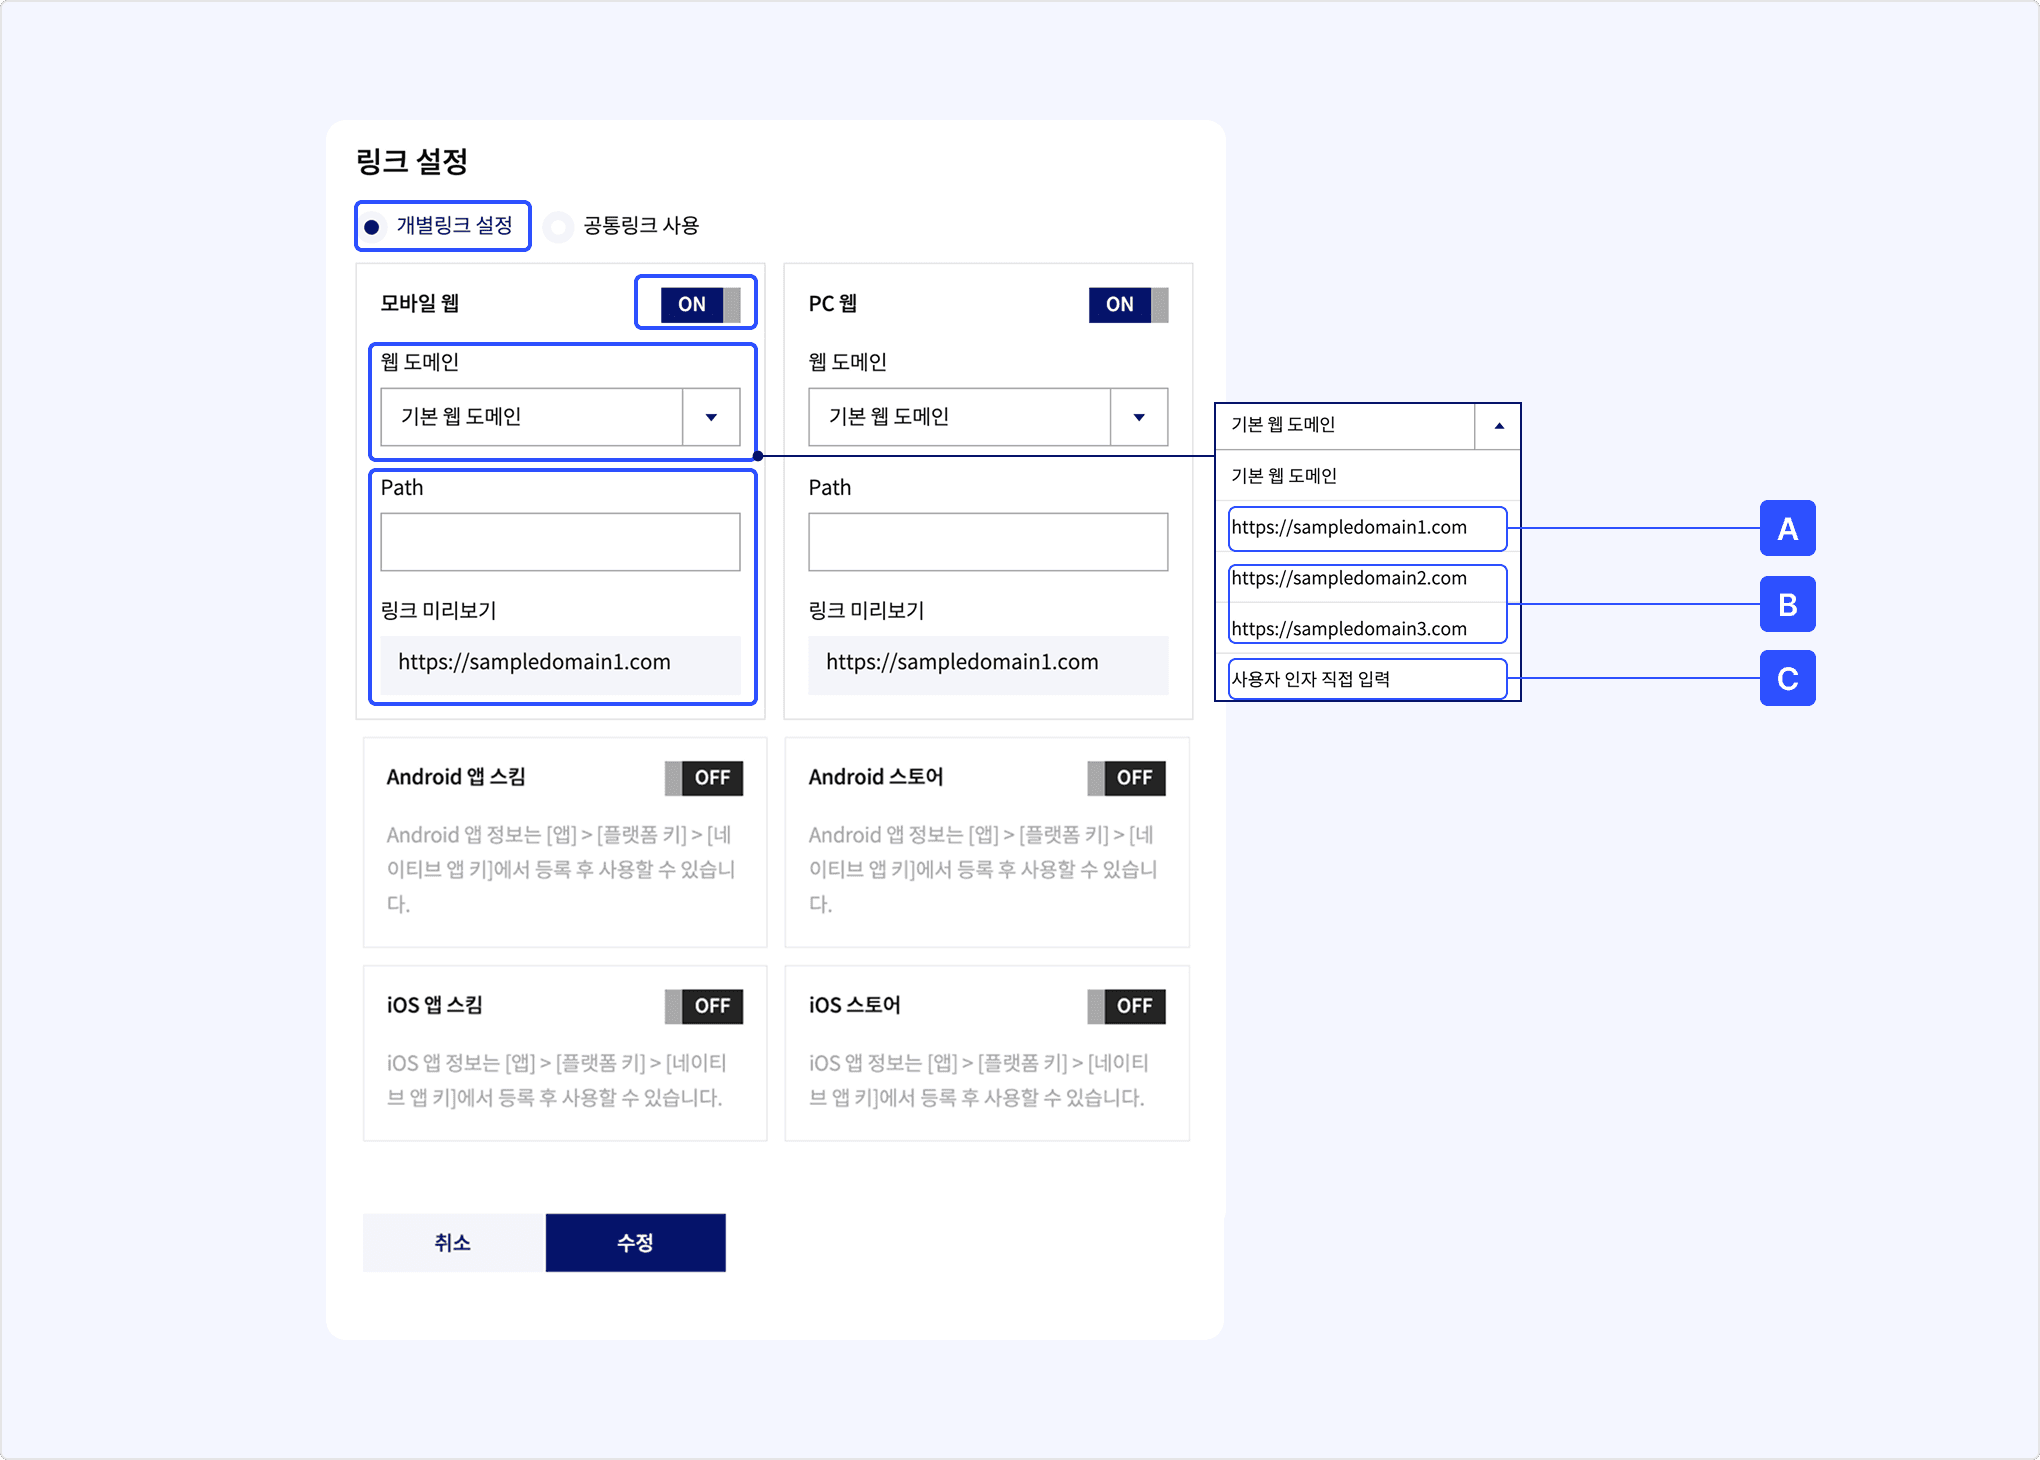
With the REST API Test Tool, call the Send me message with custom template API to check whether the saved template is sent correctly.
- Under [Authentication app], select the app where you created the template.
- Under [Access token], select [Get token].
- Select
talk_messagein the user information access scope, and then select [OK].- If this item is disabled, configure the
talk_messageconsent item as described in 1-3. Set consent item.
- If this item is disabled, configure the
- Log in with a Kakao Account. When the Consent screen appears, select and consent to [Send Kakao Talk Message].
- Enter the template ID checked in Create message template in
template_id.- Example:
5595
- Example:
- Enter the user argument values configured in Configure message components in JSON format in
template_args.- Example:
{"NAME":"Ryan"}
- Example:
- Select [Send] to call the API with the values you entered.
- Check whether the message was sent successfully.
- Check that
result_codein the response body is0. (See the response example for the Send me message with custom template API.) - Check that the configured message was sent to your Kakao Talk My Chatroom.
- Check that the user argument value appears correctly in the message header.
- Check that

After testing, send messages from your service code in the following order.
- Through Kakao Login, issue an access token for a user who consented to the
talk_messageconsent item. - Apply the template ID created in the Message Template Tool to your code.
- If values differ by user, pass user argument values in
template_args. - Call the Send me message with custom template API.
To send a message to a friend, see Send Kakao Talk messages between service users.
| Problem | What to check |
|---|---|
| The Send Kakao Talk Message consent item cannot be selected when issuing an access token. | Check whether the app's consent item is configured. |
| The message sending API cannot find the template. | Check template_id, selected app, and whether the template was saved. |
${NAME} is displayed as-is in the message. | Check whether the NAME value is passed in template_args. |
| The page does not open when selecting a link. | Check web domain registration and the link path. |
| The app does not launch from the message. | Check the native app key, custom URL scheme, and native app scheme in Common settings. |
| The same screen opens on Android and iOS. | Check whether the app scheme parameters differ by OS. |
For detailed error causes, see Kakao Talk Message error codes and Message Template FAQ.
- Send Kakao Talk messages between service users
- Send a Kakao Talk Share message with the JavaScript SDK