
This document introduces Kakao Login.
Kakao Login is a Social Login service based on OAuth 2.0 that enables users to access various services using their Kakao Account.
Users can conveniently login to services through Kakao Talk or Kakao Account. Service providers can securely receive verified user authentication information from the Kakao Developers without having to directly manage user credentials.
By adopting Kakao Login, you can provide personalized services using user information such as Kakao Talk nickname, profile image, email, gender, and age range, which can be obtained with user consent. Numerous services have already adopted Kakao Login. Create more convenient services and focus on your business with trusted Kakao Login.
To use Kakao Login, a Kakao Developers application (App) is required. For the details on an app, see Tutorial and Application.
Kakao Sync is an extension of Kakao Login that simplifies the user service signup process. It provides the Simple Signup feature, allowing users to agree to the consent items and service terms at once on the Kakao Login Consent screen. For the details on implementation methods, see Kakao Sync Concepts.

This section explains how to integrate Kakao Login into a service.
Check the required items for your service in the table below.
| Category | Description |
|---|---|
| Data | User information provided by the Kakao Developers that can be used for user registration and service features. For the details, see User Information. |
| Features | Functions provided by the Kakao Developers that can be used for service operations. |
| Environment | Service environments supported by the Kakao Developers, including programming languages, frameworks, system architecture, and mobile/web support. For the details on supported environments for each feature, see Scope of Support. |
A Kakao Developers app is required to use Kakao Login. If you do not have any app, see Register an Application to create a new one. If you already your service app, you must use the app.
To see how to check and configure the registered app, see Application. To see how to configure Kakao Login, see Prerequisites.
Kakao Login is designed to support various user flows that align with service policies and UI/UX considerations. It also provides ease of use in diverse service development environments by offering not only REST APIs but also Kakao SDKs (Software Development Kits) for JavaScript, Android, iOS, and Flutter platforms.
Select an implementation method suitable for your development and service environment to perform integration development and testing. REST APIs and Kakao SDKs can be used together. The Details, including request and response specifications and examples for integration, can be found below.
- Developer Documentation
- REST API examples by programming language
This section explains about the login functionality offered by the Kakao Developers.
Login is the process in which a user verifies authentication themselves and grants authorization to a service. When a user successfully logs in using Kakao Login, secure tokens are issued to the service. The service can include this tokens in requests to prove its authorization.
This section explains the process of logging into the service using Kakao Login. See the sequence diagram and the step-by-step explanation below.

-
Kakao Login
- When the user selects the Kakao Login button on the user client, the service requests an authorization code from the Kakao API server.
- The Kakao API server requests authentication from the user and, upon success, prompts the user with the Consent screen for authorization.
- After authorization is completed, the Kakao API server redirects the user to the redirect URI, including the authorization code.
- When the service requests a token using the authorization code included in the redirect URI, the Kakao API server links the user with the service app and issues the user's token to the service.
-
User verification and registration
- When the service requests the Retrieve user information API using the issued Token, the Kakao API server responds with the user's information.
- The service verifies whether the user is an existing member using the provided user information. Based on the result, the service either proceeds with user registration or directly processes the login.
-
Service login
- The service server creates a login session for the user’s client.
- The user client completes the login process using the issued session and navigates to the logged-in service screen.
Authentication is the process of verifying whether the user requesting access to an account is the actual owner. A common authentication method is verifying the user’s entered ID and password.
Kakao Login utilizes Kakao Talk or Kakao Account for user authentication. See the authentication process for each method below.
-
Authentication via Kakao Talk
- Launch Kakao Talk on the user’s device.
- Authenticate the user using the Kakao Account linked to Kakao Talk.
-
Authentication via Kakao Account
- Display the Kakao login screen in the user’s service environment.
- Authenticate the user using the entered Kakao Account information.
Kakao Login provides authentication via Kakao Talk and Kakao Account, categorized by development environment, to support various service environments.
For JavaScript SDK Simple Login, authentication is first attempted via Kakao Talk. If Kakao Talk is not installed, authentication falls back to Kakao Account. Differences between selectable APIs for other development environments can be found in the Implementation method in the reference column of the table below.
Authorization is the process of obtaining user consent through the consent screen to allow Kakao Developers to provide the user information requiring consent or features requiring access permissions requested by the service. Kakao Developers do not provide any resources to the service that have not been authorized by the user.
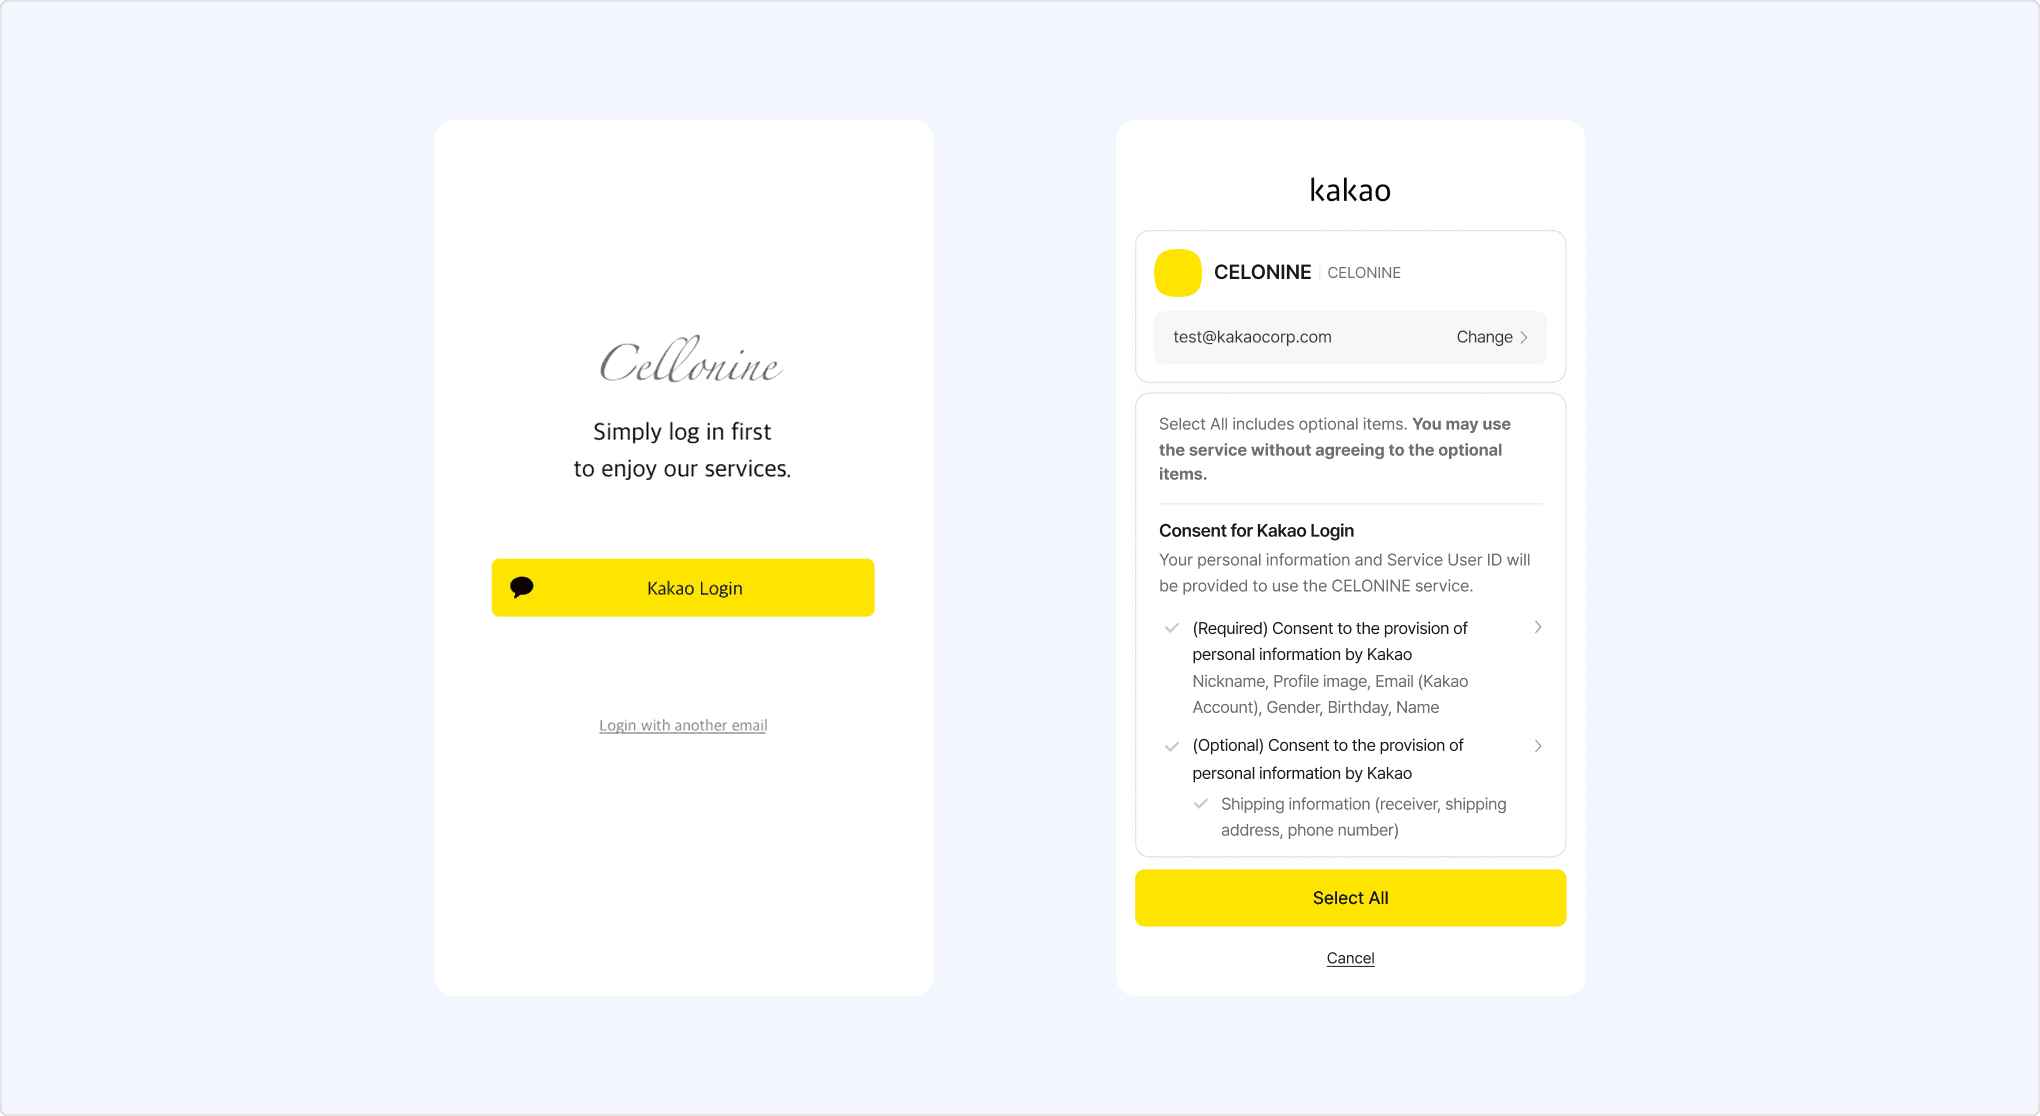
The service can configure the consent screen by setting the required consent items in the app. When Kakao Login successfully completes user authentication, it prompts the user for authorization via the Consent screen.

The user completes authorization by reviewing [A] Personal information provision notice on the Consent screen and agreeing to the required [B] Consent items for service use. Once authorization is completed, the service receives an authorization code for issuing a token.
Kakao Sync allows services to configure the Simple Signup feature, enabling users to agree to both the service terms and the consent items in a single step. Additionally, services can verify the agreed Service terms using the Retrieve consent details for service terms API and request consent only when necessary.
A token is a string that contains user authentication and authorization information. The service can request a token issuance using the authorization code obtained as a result of authorization. The issued token can be included in API requests to verify access to information or the permission to use specific features.
Kakao Login issues an access token and a refresh token in accordance with the OAuth 2.0 standard. When OpenID Connect is enabled, an ID token is additionally issued. For the details, see the token roles and expiration times table.
For service security, the REST API key (including the key automatically created with the app) is added with the Client secret feature enabled by default. Therefore, you must include the client_secret parameter in your token issuance requests. If necessary, you can disable this feature.
| Type | Role | Expiration time |
|---|---|---|
| Access token | Included in API requests to authenticate the user and verify authorization | Android, iOS: 12 hours JavaScript: 2 hours REST API: 6 hours |
| Refresh token | Renews the access token without additional authentication | 2 months, renewable from 1 month before expiration Important: A new refresh token is issued upon renewal, and the previous refresh token is revoked. |
| ID token | Provides user authentication information for login sessions; requires OpenID Connect activation | Same as the access token |
App keys are another method of API request authentication, similar to tokens. The Kakao Developers provides app keys for each app according to the development platform and specific permissions. All app keys must be used only within the scope that aligns with their intended purpose. For the details, see App key.
The following is a list of additional features related to Kakao Login provided by the Kakao Developers. For the details, see each document.
- Kakao Account easy login: Displays the account selection screen when Kakao Account Easy Login information is available in the browser.
- Auto-login from Kakao Talk: Automatically navigates a logged-in page when a user accesses the service page via the Kakao Talk in-app browser.
- Login regardless of status: Re-authenticates the user regardless of previous login status.
- Create Kakao Account before login: Requests Kakao Account signup before proceeding with Kakao Login.
- Request additional consent: Sends an authorization request specifying Consent items that the user has not yet agreed to.
- Provide login hint: Automatically inputs the provided ID value into the Kakao Account login page.
- Simple Signup: Includes service terms in the Kakao Login Consent screen during an authorization request.
- Get consent to desired service terms: Specifies service terms registered in the service app during an authorization request.
- Get ID token of OIDC: Issues an ID token that can be used instead of a login session.
The service can link the service app and the user's Kakao Account through the Kakao Login feature.
When a user agrees to the required items for service use on the consent screen, the Kakao Developers issues tokens to the service. Using the issued access token, the service can receive the user information that the user has agreed to provide from Kakao, including the service user ID.
Through this process, the user's account is linked to the service app, and the user is considered registered to the service. The service can call Kakao APIs using the user's token, and the user can use various features provided by Kakao within the service.
The service must check whether the user linked to the app is an existing member, and either sign up the user as a new member or map them to an existing member.
If the user no longer wishes to use the service, the service must process account deletion, including a request to unlink the Kakao Account from the app.
For the details on app linking, see Service login process.
The service can check whether a user is an existing service member by below steps.
- Request the Retrieve user information API using the token of the logged-in user.
- Compare the provided Kakao Login user information with the existing service member information to determine if the user is an existing member. See the recommended criteria below.
- If the service user ID matches, consider the user as an existing member.
- If the user ID is different but the name, email, birthdate, and birth year all match, consider the user as an existing member.
- Based on the verification results, proceed with the appropriate member registration process below.
By adopting Kakao Sync, you can obtain additional user information to verify existing membership status and streamline the signup process.
The Kakao Developers unlinks users who have not completed the signup process daily. For the details, including the criteria for determining incomplete signups, see Unlinking users with incomplete signup.
This is the member registration process when the Kakao Login user does not match any existing service member information.
- Register as a new member.
- Provide the user with the option to map to an existing service member account.
This is the member registration process when the Kakao Login user partially matches the existing service member information. (Example: When the user information matches multiple service member)
- Provide the user with hints about the existing service member account and verify the account. (Example: Email authentication)
- If the user successfully verifies the account, ask for their consent to map with Kakao Login.
- If the user agrees to map, process the mapping with the service member account; if they decline, process through signup.
This is the member registration process when the Kakao Login user information fully meets the existing member criteria of the service (Example: When an existing account matches both email and CI).
- Provide the user with hints about the existing service member account and confirm their intention to map to Kakao Login.
- Recommended account hints: Masked service member account ID, registration date, nickname.
- If the user agrees to map, process the mapping with the service member account. If they decline, process through signup.
The service should register a new user or map to an existing user based on the result of the verifing registered users.
Signup is the process of adding a user who logs in with Kakao for the first time as a service member.
Since the Kakao Developers link the app and the user at the time of token issuance, the signup process should be handled after the token is issued. If the service fails to process member registration, the user may have to go through the signup process every time they log in, causing inconvenience.
The service must implement its own member information management, including registration and account deletion, in its database. Kakao does not access service data and cannot store or delete member information on behalf of the service.
Mapping is the process of registering Kakao Login information to an existing service account when a user logs in with Kakao for the first time. By mapping Kakao Login information, you can improve data consistency and accuracy, and users can seamlessly continue their existing usage history.
Before Mapping, the service must verify if the user wants to map to Kakao Login. If the user agrees to map, proceed with the steps below.
- Map the service user ID to allow login to the existing service account via Kakao Login.
- Update the service member information using Kakao Login user information, excluding the service user ID.
- If additional user information is required for signup, request additional consent to obtain it from Kakao or collect it independently.
If the user does not agree to mapping, the service must register the user as a new member. Even if the user information matches existing member information, the user may not want to link accounts or the actual account owner may be different.
Do not use changeable information such as an email address or phone number from the Kakao Account as the service user ID. If users change this information, the response from the Retrieve user information API may differ from the service member information. Users can modify all Kakao Account information except for the service user ID and CI, and they can also delete the CI if needed. (Note: Cautions when mapping existing members with Kakao Login)
Kakao Login users who no longer wish to use the service can unlink their service app through the account deletion process or request unlink directly via the Manage connected services feature provided by the Kakao Developers.
To prevent unnecessary retention of user information, the service must irreversibly delete user information upon account deletion. For the details, see User information deletion when a user deletes the account.
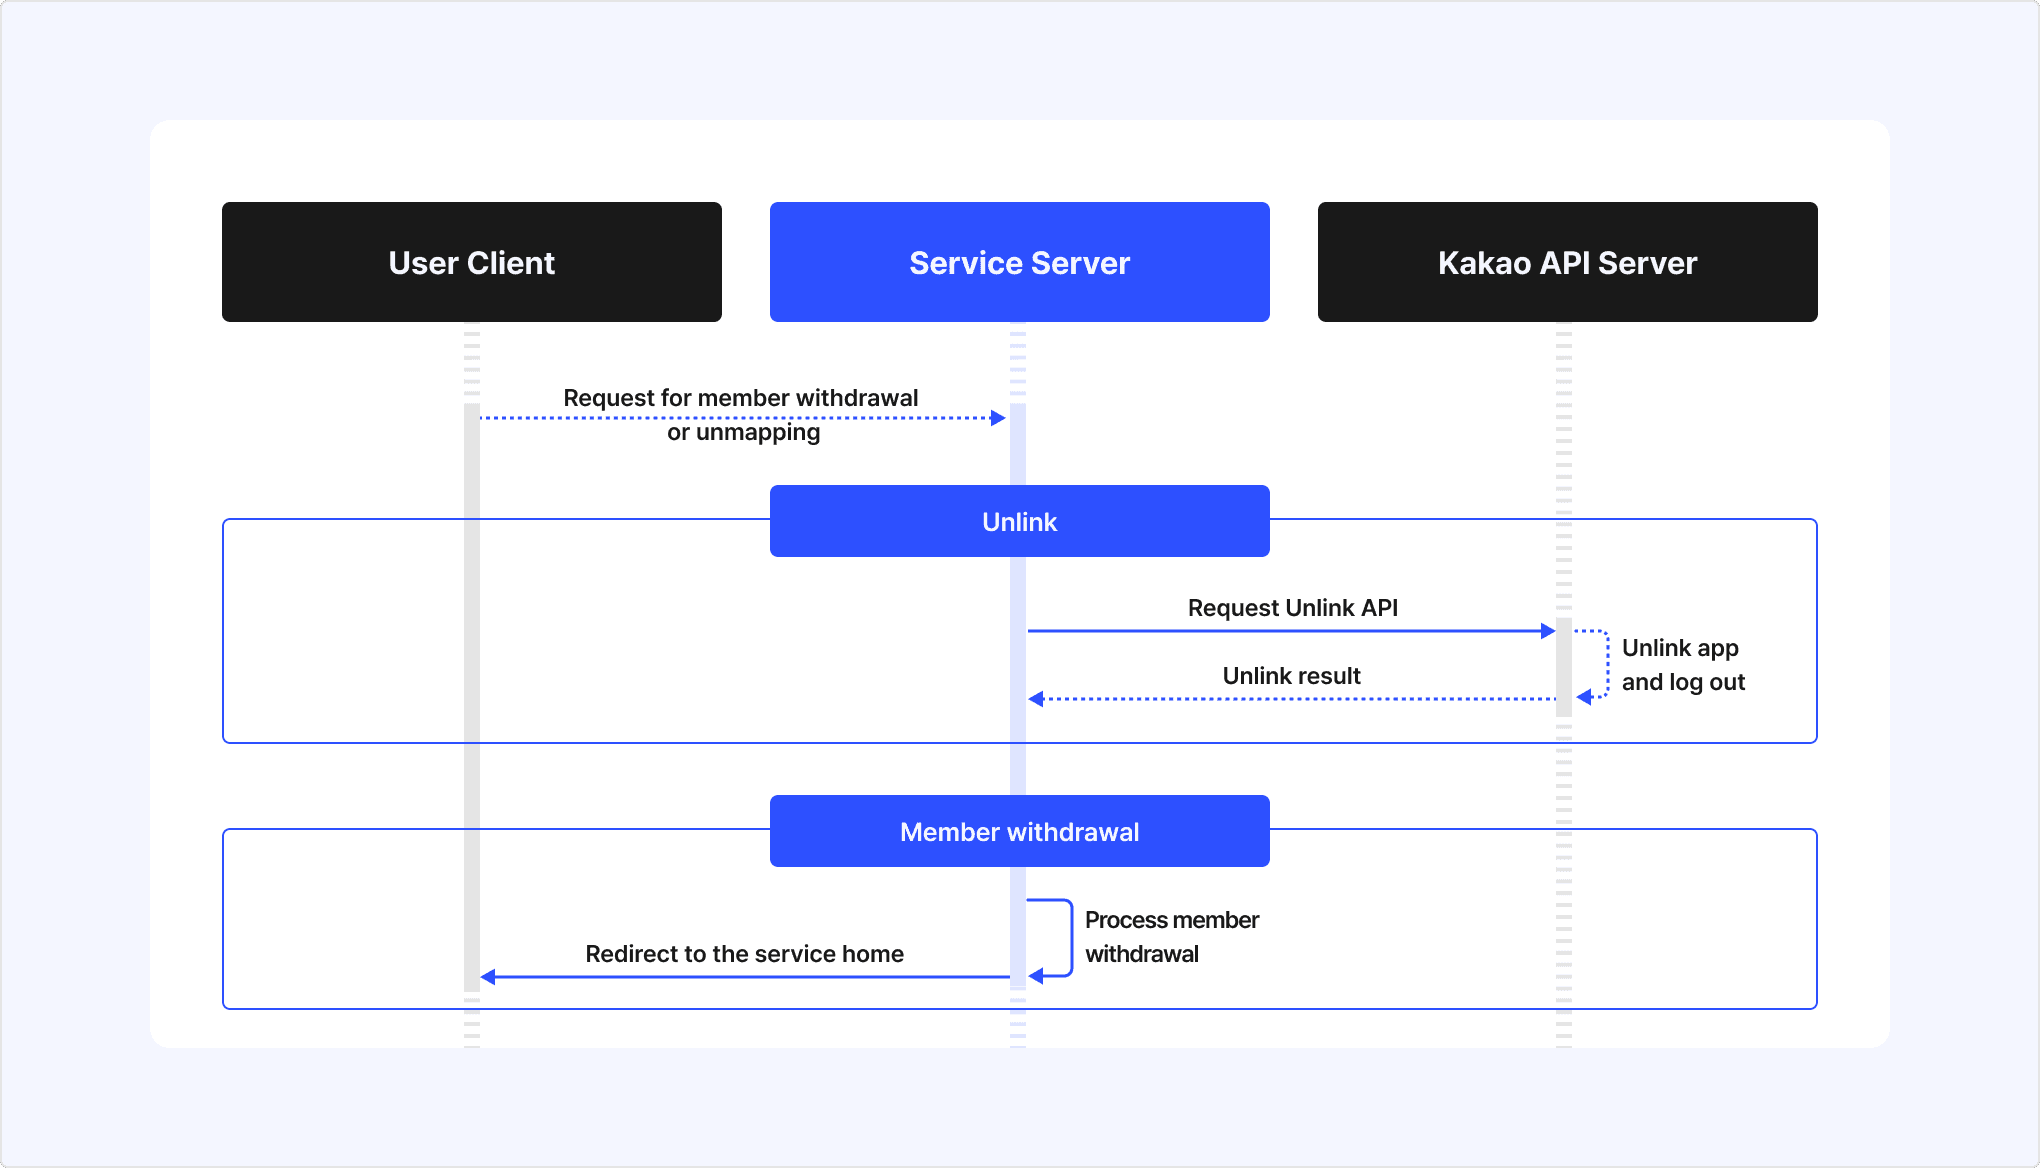
If a user who has been using the service via Kakao Login requests to withdraw from the service or unmap their Kakao Login, the service must include an unlink request in the account deletion process to unlink the app from the user. Upon receiving the unlink request, the Kakao Developers will revoke authorization, log the user out, and initiate the user information deletion process.
See the sequence diagram and explanation below.
-
Unlink
- When a Kakao Login user requests account deletion or unmapping, the service requests the unlink API for the user to the Kakao API sever.
- The Kakao API server Unlinks the user from the app and then processes logout.
- After the unlink is complete, the Kakao API server returns the unlink result to the service server.
-
Account deletion
- Upon receiving the unlink result, the service processes the user's account deletion.
- After completing the account deletion process, the service redirects the user to the service home.
Unlinking withdraws consent to use the service that user agrees to when linking with a service app, and revokes both access token and refresh token issued to the service. This is intended to protect user information and complies with the OAuth 2.0 Token Revocation (RFC 7009) specification.
After the user's Kakao Account is unlinked from the service, the service can no longer call APIs or access user information with the corresponding tokens.
Unlinking occurs in the following cases:
- (A) When a user requests account deletion from the service and the service calls the Unlink API. (See: Service account deletion process)
- (B) When the user directly unlinks the service through external channels, such as through Manage connected services, Kakao Account deletion, or customer support inquiry.
- (C) When the Kakao Developers' system unlinks users with incomplete signup for privacy protection.
If a user unlinks from the service by (B) or (C) method, the service should be able to recognize the unlink status by configuring the Unlink webhook or Account status change webhook. By using the webhook feature, the service server can be notified when a user unlinks from the service. It is recommended to use the unlink webhook to synchronize the service member status with the linked status on the Kakao Developers.
| Category | Unlink | Logout |
|---|---|---|
| Purpose | To revoke user's consent to use the service. Relationship between service and user is completely disconnected. | To end user's login session in the service. Relationship between service and user is maintained. |
| When it occurs | See Unlink cases. | When the user selects the [Logout] button within the service app. |
| Result | The service is unlinked, and the user is logged out from the service All access and refresh tokens issued to the service are revoked. Cannot call APIs with those tokens. | The user is logged out from the service. Depending on the request method, all issued tokens can be revoked. (See: Logout process by authentication method) Cannot call APIs with those tokens. |
| Service usage | Cannot use the service until linking again. | Can use the service after logging in again. |
Logout is a feature that invalidates the user's token issued for the service. If a logout request is successful, you can no longer request the Kakao API with that Kakao Login user's information. Since the Kakao Account login state in the web browser remains active even after logout, follow-up actions, such as redirecting to the service's initial screen, are required.
The process of logout depends on the authentication method used in the request, and the available authentication methods vary by development platform. For the details, see Logout process by authentication method.
This section explains the differences in logout behavior depending on the authentication method used for logout requests.
| Authentication method | Token expiration handling | Device logout | Supported development platforms |
|---|---|---|---|
| Access token | Only the access token used in the request | Only the device logged in with the access token used in the request | REST API Kakao SDK |
| Admin key | All tokens of the user | All devices logged in with the user's tokens | REST API |
Below is a list of additional features related to logout. For the details, see each document.
- Logout of service and Kakao Account: Provides a bridge page to logout from both the service and the Kakao account.
A webhook is a feature that delivers information to the service when there is a change in a Kakao Login user's account status. This allows the service to verify the changes and take appropriate actions.
Below are the webhooks provided by Kakao Login:
- Unlink webhook: Sends relevant information to the service for the user's account deletion when the user's Kakao account is unlinked from the service app.
- Account status change webhook: Sends the service of account status changes, such as app link and unlink, password changes, and deactivation, to allow the service to respond accordingly.
Below is a list of security-related documents for Kakao Login that can help enhance the safety of user logins when applied to a service. For the details, see each document.
- Client secret code: Configures the service to allow token issuance and renewal only when the pre-issued Client secret code is included.
- Parameters for security: Configures OAuth 2.0 and OpenID Connect standard security parameters.
- Allowed IP addresses: Allows only the registered IP addresses.
- Security guidelines: Provides security recommendations for services using the Kakao Developers.
The Kakao Developers provides user personal information to services based on the consent for the Provision of personal information to third parties. Therefore, services bear full responsibility for managing the provided personal information and must strictly adhere to the following guidelines to securely protect and manage user information.
Services must irreversibly destroy all user personal information upon user's account deletion in accordance with the Kakao Developers Operating Policy. It is strongly recommended to verify user's account deletion status beyond the account deletion process using the Unlink webhook.
If personal information needs to be retained for a certain period after user's account deletion, explicit user consent is required. The service user ID (user_id) assigned when linking a Kakao Account with an app is also considered personal information and must be destroyed.
The service must collect only the minimum user information necessary to provide its functionality and use the collected information appropriately for its intended purpose. For the purpose of providing each user information item through the Kakao Developers, see user information.
User information may be changed or deleted. It is recommended to request the Retrieve user information API each time a user logs in to update the service's member information with the latest data.
The user email address information provided by the Kakao Developers should always be verified for validity and authentication status before use.
Invalid email addresses are partially masked (Example: ka***@kakao.com), which may limit their usability. Unauthenticated email addresses may not receive emails sent by the service. Additionally, since email addresses can be changed upon user request, using them as an ID or a criterion for determining the same user is not recommended.
According to Article 28-8 of the Personal Information Protection Act (Transfer of personal information overseas), when providing, outsourcing, or storing user personal information obtained through the Kakao API in a foreign country, the below items regarding the Transfer of personal information overseas must be disclosed to the user, and consent must be obtained in advance.
- Destination country of the personal information transfer
- Date and method of personal information transfer
- Name of the recipient of the personal information (for corporations, the company name and the contact details of the data protection officer)
- Purpose of personal information use by the recipient, as well as the retention and usage period
Cases where the transfer of personal information overseas applies include the following:
- When transferring and processing domestic user information by a foreign entity.
- When a foreign entity accesses, stores, or processes domestic user information.
For details on how to register transfer of personal information overseas, see Prerequisites.
The consent, inquiry, and revoke functions for service terms provided by Simple Signup are intended for expressing user intent to the service, not Kakao. Therefore, the service must recognize that the management and responsibility for the service terms of the app rest entirely with the service and operate in a way that prevents potential damages.
The content of the service terms registered in the app must be identical to the actual service terms and comply with relevant laws. If the registered service terms differ from the actual terms or do not comply with relevant laws, the service may be restricted.
To protect personal information, the Kakao Developers has been unlinking users who have not completed service registration on a daily basis to protect user since December 28, 2020. The criteria for determining incomplete registration are as below.
- When using the Auto-link: If the service does not call a user information request API, such as the Retrieve user information API, within 24 hours after the user's first Kakao Login.
- When using manual signup: If the service does not call the Manual signup API within 24 hours after the user's first Kakao login request, causing the user not to be linked to the service app.
Unlinking users with incomplete signup can be identified through the Unlink webhook. For the details, see the notice.
The belows describes the social login policies of major open markets that should be referred to when using Kakao Login in a service. For more details, see the usage policies of each open store.
For services providing an Android app, Google Play policies require that users be provided with an in-app option to delete their app account and related data. Failure to comply with this policy after May 31, 2024, may result in additional corrective actions, including app removal from Google Play. For the details, see Understanding Google Play's app account deletion requirements.
For services providing an iOS app, Apple app review guidelines require that apps using social login must offer in-app options to unlink social login and delete the user account. This review guideline has been applicable to submissions since January 31, 2022. For the details, see App Review Guidelines.
In addition to the key aspects of Kakao Login introduced in this document, the following provides guidance on additional Kakao Login-related documents.
For more effective use of Kakao Login, see Utilize. This section provides key supplementary information related to the core concepts explained above.
Details on configuring Kakao Login are covered in Prerequisites. In that document, tags attached to section titles distinguish between required settings that must be configured and optional settings that can be adjusted as needed.
Additional documents are available covering various aspects of Kakao Login, including implementation methods for different development platforms (REST API, JavaScript, Android, iOS, Flutter), explanations and usage of supplementary features (Webhooks), as well as resources such as the Design guide, FAQ, and Error code. For the details, see each document.
The availability of each API and feature across development platforms can also be checked in the Scope of support.
| API | Method | URL | Description |
|---|---|---|---|
| Get authorization code | GET | https://kauth.kakao.com/oauth/authorize | Requests authorization code issuance to display the Kakao login page and the Consent screen to the user, and receives an authorization code when the user agrees. |
| Get token | POST | https://kauth.kakao.com/oauth/token | Requests a Kakao Login Token with the issued authorization code. |
| Logout | POST | https://kapi.kakao.com/v1/user/logout | Invalidates all tokens of the user issued for the service to end the Kakao Login session. |
| Logout of service and Kakao Account | GET | https://kauth.kakao.com/oauth/logout | Displays a screen that allows users to log out of the service and Kakao Account together. |
| Unlink | POST | https://kapi.kakao.com/v1/user/unlink | Withdraws the user's consent and revokes the issued access and refresh tokens. |
| Retrieve access token information | GET | https://kapi.kakao.com/v1/user/access_token_info | Checks the information and validity of the access token. |
| Refresh token | POST | https://kauth.kakao.com/oauth/token | Refreshes the access and refresh tokens. |
| Retrieve user information | GET/POST | https://kapi.kakao.com/v2/user/me | Retrieves the user information linked to the app. |
| Retrieve multiple user information | GET | https://kapi.kakao.com/v2/app/users | Retrieves information for multiple users linked to the app. |
| Retrieve user list | GET | https://kapi.kakao.com/v1/user/ids | Retrieves the list of member numbers for users linked to the app. |
| Store user property | POST | https://kapi.kakao.com/v1/user/update_profile | Saves values to the user properties that you defined for your service. |
| Retrieve shipping address | GET | https://kapi.kakao.com/v1/user/shipping_address | Retrieves the shipping address information registered to the user's Kakao account. |
| Retrieve consent details | GET | https://kapi.kakao.com/v2/user/scopes | Retrieves the list of detailed information for consent items the user has agreed to. |
| Revoke consent | POST | https://kapi.kakao.com/v2/user/revoke/scopes | Revokes consent for consent items agreed to by the user. |
| Retrieve consent details for service terms | GET | https://kapi.kakao.com/v2/user/service_terms | This API enables you to check the service terms that a user has consented to. |
| Revoke consent for service terms | POST | https://kapi.kakao.com/v2/user/revoke/service_terms | Revokes a service terms that a specific user has agreed to. |
| Advanced: Set consent to service terms | POST | https://kapi.kakao.com/v2/user/upgrade/service_terms | Processes the user as having agreed to specific service terms in a service that uses Kakao Sync. |
| OIDC: Get Discovery document | GET | https://kauth.kakao.com/.well-known/openid-configuration | Retrieves the OpenID Connect service provider metadata document provided by Kakao Login that complies with the standard specification (OpenID Connect Discovery). |
| OIDC: Get public key | GET | https://kauth.kakao.com/.well-known/jwks.json | Retrieves the list of public keys used by the Kakao authentication server for signing the ID token. |
| OIDC: Get ID token information | POST | https://kauth.kakao.com/oauth/tokeninfo | Retrieves debugging reference information for the issued ID token. |
| OIDC: Get user information | GET | https://kapi.kakao.com/v1/oidc/userinfo | Retrieves basic information about the logged-in user. |
| Advanced: Manual signup | POST | https://kapi.kakao.com/v1/user/signup | Manually links the app and the user in an app that does not use Auto-link. |