- Docs>
- Kakao Sync>
- Prerequisites
Kakao Sync


Prerequisites
This document explains what you have to do before integrating Kakao Sync.
Tag used in this document
| Tag | Description |
|---|---|
| Required | You must apply the settings marked with this tag before using the Kakao APIs. If this tag is not attached, you can optionally apply the setting depending on the functions you want to use. |
What you need
Here are the materials required to complete the prerequisites. To create or set each one, you need to visit different websites.
| Material | Description | Website |
|---|---|---|
| Kakao Account | An account used for the Kakao services including Kakao Developers | My Kakao Account |
| Business Channel | A Kakao Talk Channel used for marketing and displayed in the Kakao Sync Simple Signup screen | Kakao Talk Channel Partner Center |
| Business Application | A service application registered in the Kakao Developers | Kakao Developers |
| Set as a team member | Team is a system to manage the app access levels. If you want several developers to manage your app, register the developers as team members in [App] > [Member] on the app management page. Only team members can see or modify app information. | Kakao Developers |
1. Set up your app Required
Add an application and register your service and company information in the Kakao Developers. If your service is already using Kakao Login, skip to 3. Set up Kakao Talk Channel.
| What you do | Required |
|---|---|
| Register an app. Important: If your service already has an app in the Kakao Developers, you must use the existing app to adopt Kakay Sync, not register a new app. Otherwise, you cannot use the user data linked with your existing app. |
O |
| Register service information. | O |
| Manage team members. | O |
2. Set up for Kakao Login Required
Because Kakao Sync is an extended version of Kakao Login, you must set for Kakao Login ahead before applying Kakao Sync.
| What you do | Required |
|---|---|
| Activate Kakao Login. | O |
| Register Redirect URI. | O |
| Set consent items. | O |
3. Set up Kakao Talk Channel Required
Kakao Sync provides a function to add the channel addition option to the Simple Signup Consent screen. This function enables users to decide whether to get news from your Kakao Talk Channel on the Consent screen when they log in. To use this function, you must do the followings:
| What you do | Required |
|---|---|
| Confirm qualification | O |
| Switch to a Biz app. Important: Only allowed with the Owner accountAccount that has all permission for the app, such as viewing or modifying all app information, inviting a member, switching to a Biz app, re-issuing app keys or deleting an app.. |
O |
| Upgrade to Business channel in Kakao Talk Channel Partner Center. Important: Only allowed with the Master account. Note: If you do not have a Kakao Talk channel, create a new Kakao Talk Channel. To check if your business information is saved, go to [채널 (Channel)] > [비즈니스 심사(Business verification)] in Kakao Talk Channel Partner Center. |
O |
| Connect Kakao Talk Channel to app Only after a Biz app is connected to a Business Channel, you can get permission to use particular user information. |
O |
| Select a primary channel to be displayed on the Simple Signup Consent screen. | O |
4. Request for the permission Required
In [App] > [Request additional features] on the app management page, request for the permission of consent items for personal information in the List of additional features to use user information required for the service.
Kakao does not provide too much user information without a clear purpose, and conducts a review before providing user information to protect user information.
After the review, we grant the permission to set the required user information as [Required] or [Optional] consent item. A consent item is an app setting to receive user information.
The permission request screen of consent item for personal information is organized as below.
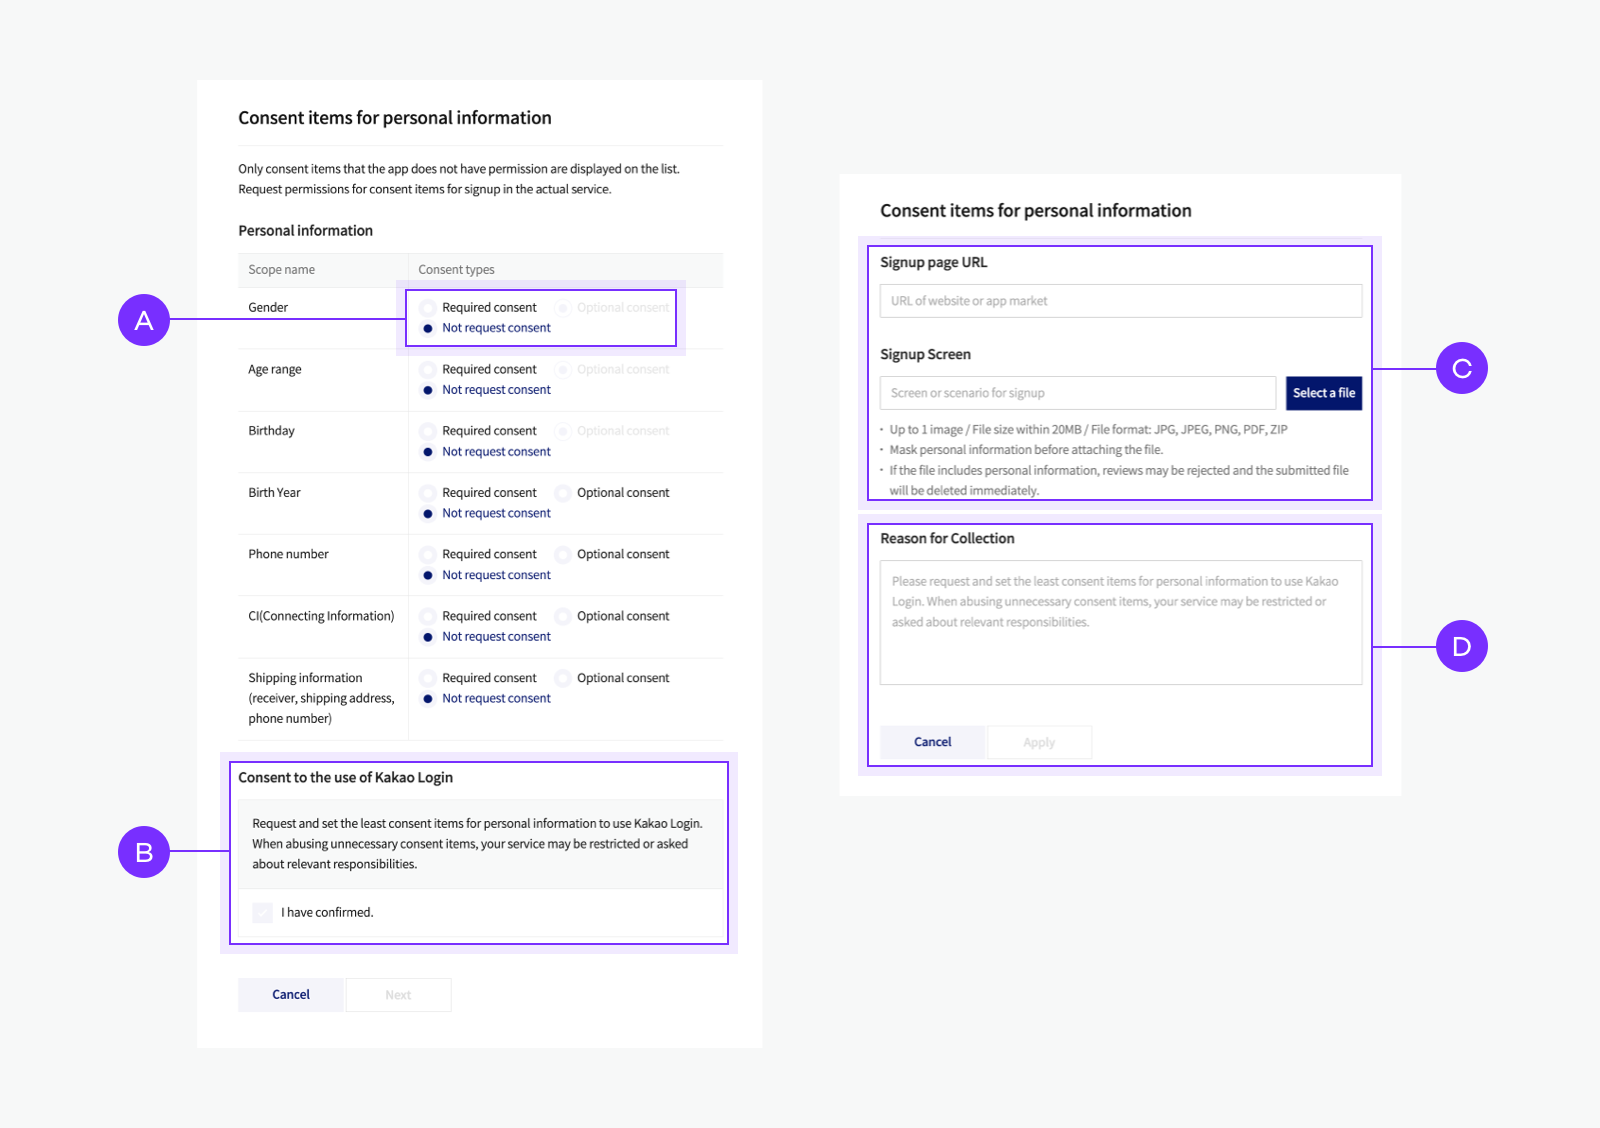
You can select 🅐 Consent types in [Required consent], [Optional consent], or [Not request consent]. Need to select at least 1 consent item.
After checking and agreeing 🅑 Consent to the use of Kakao Login, select [Next] to enter the inputs related to signup and the reason for collection.
Kakao checks what each user's information is used for in the service, so you must enter the 🅓 Reason for Collection. Attach a confirmation document that proves the reason for the collection to the 🅒 Signup information that shows the items collected when signing up for the service. If it is difficult to attach confirmation documents due to site development, you can substitute a plan or design mockup.
After completing all items, select [Request] to review the app. It takes 3 to 5 business days. During the review, Kakao checks both the information entered and additional documents, as well as whether the current service's signup criteria and scope of information utilization are consistent with the app.
If you pass the review and are granted permission, you are ready to implement Kakao Sync. Upon completion of the review, the Kakao Sync Simple Signup feature settings on the app will be activated, and consent items for personal information is available. If the review is rejected, you will need to reapply by completing the deficiencies.
Note: User information
The [Required consent] items for user information is required to register or use the service. Users can complete KakaoSync Simple Signup only by agreeing to provide user information that is [Required consent].
Even if the user agreed to provide the information when logging in to the KakaoSync adoption service, if the user has never entered the information on the Kakao platform, it is not possible to provide it because there is no data.
The [Optional consent] user information corresponds to items that can complete Kakao Sync Simple Signup even if the user does not agree. User information that is [Optional consent] may not be provided by Kakao depending on whether the user agrees or not, so user information that is essential for signing up and using the service should not be set to [Optional consent].
If the purpose of requested user information is unclear or inappropriate, it may be rejected at review. For example, if you request to use shipping address information in a shopping mall that sells clothing and other items, then there is no problem, but if you request to use it in a service that does not require shipping address information, then it will be rejected.
Note: Re-review
If you need to provide additional user information after implementing Kakao Sync, you will need to request for review the user information again. The review will take the same amount of time as the review when Kakao Sync was implemented. The reviews are not required when disabling consent items or changing [Required consent] items to [Optional consent] items.