
This document guides you on how to acquire members after adopting Kakao Sync, and how to send targeted messages or ads to those members.
If you are a Kakao Sync partner operating physical stores, QR codes can be one of the best ways to acquire members. After scanning a QR code, users can easily sign up by simply consenting on the Consent screen.
After integrating Kakao Sync Simple Signup, you can encourage signup at physical stores using QR codes. Users can complete signup with a single consent after scanning a QR code, which is useful for acquiring members in stores.
Because this uses the account information of the Kakao Talk client installed on the user's device, you can reduce the steps where users manually enter their Kakao Account ID and password.
You can also use QR codes at physical stores for membership point accumulation. If you set the QR code's Redirect page to a membership page, users can scan the QR code and show a barcode to accumulate mileage or points.
You can use QR codes to identify the signup location of new users. To implement this, when calling the Kakao Login request for signup, pass a store-specific tracking code in the state parameter. See Request authorization code API.
The flow from the user's perspective is as follows.
- The user scans a QR code attached at a store with Kakao Talk or another app.
- In the Kakao Talk in-app browser, the user sees the Kakao Sync Simple Signup screen for service signup.
- When the user consents, service signup is completed and the user moves to a screen designated by the service, such as a membership screen.
QR code use case
To encourage new member signup or provide membership services with a QR code as above, prepare the following.
A service landing URL is not the page users ultimately see. It is your service URL that calls the Kakao Sync Simple Signup screen.
If the [Start with Kakao] button on your service login page calls the Kakao Sync Simple Signup screen directly, you can use the URL that button navigates to as the service landing URL. Otherwise, prepare a separate landing page for QR or advertising.
Examples by integration method are as follows.
- REST API method: When a user accesses a service URL such as
https://example.com/login/kakao, implement the page to call the Get authorization code API. If needed, you can request the authorization code only when the user agent is Kakao Talk. - JavaScript SDK method: When a user accesses a service URL such as
https://example.com/login/kakao, initialize the JavaScript SDK on that page and call Kakao Login to open the Kakao Sync Simple Signup screen.
With this implementation, users enter the service landing URL via a Kakao Sync permalink through the QR code. After that, from the service landing URL, call the Kakao Sync Consent screen and create a member or process login after the user consents. For how to implement the landing URL, see Development guide.
To implement the QR code scenario, you need a short connection URL called a Kakao Sync permalink. It is used for in-store QR codes, store promotions, ad creatives, and more to connect users to your service landing URL in the Kakao Talk in-app browser.
(Example: https://pf-link.kakao.com/.../...)
Regardless of the scanner type the user uses, it is required to launch the Kakao Talk client to reduce the hassle of entering account information, and to launch the Kakao Talk in-app browser to move to the partner's service URL.
QR code images using Kakao IP are not currently supported. To generate a QR code, use a QR generator.
You cannot create a permalink yourself. You must request it through DevTalk.
- Before requesting, complete the followings:
- Complete the required settings described in Prerequisites.
- Develop a service landing URL that can call the Kakao Sync Consent screen when a user accesses it.
- Confirm that the landing URL opens correctly in the Kakao Talk in-app browser and that signup or login is completed.
- In DevTalk > Kakao Sync, select [글쓰기(Write)] and write the following information.
- Service landing URL
- The search ID of the Kakao Talk Channel connected to the app. See How to check Kakao Talk Channel profile ID.
A permalink is a connection URL that launches the Kakao Talk client and the Kakao Talk in-app browser. It does not skip or bypass Kakao Sync integration. Use it only after you complete Kakao Sync integration, and only when you have a service landing URL to redirect to.
If you need to distinguish traffic sources by store, campaign, or ad creative, you can append parameters to the permalink.
A Kakao Sync permalink has the following format.
When creating a QR code from a permalink like the above, you can use a publicly available QR code generator. Until Kakao provides an official promotion tool, generate QR codes yourself with the issued permalink.
A QR code created from a permalink opens the service landing URL in the Kakao Talk in-app browser no matter which app scans it. For example, if the service landing URL is https://www.kakaocorp.com, the user reaches that URL in the Kakao Talk in-app browser after scanning the QR code.
If you place the same QR code at every store, all users move to the same service URL. To show different event pages by store or analyze the entry point, generate QR codes from permalinks with different parameters for each store.
For example, to pass state=1, put the URL-encoded value of state=1, which is state%3D1, in query.
To distinguish by store, use different values as below.
When a user opens the link above or scans a QR code generated from that link, it opens in the Kakao Talk in-app browser with the parameter appended to the service landing URL. Based on the passed parameter, your service can determine the traffic source and branch to a store-specific event page or a seasonal event page.
When using parameters, check the following.
- Pass parameter values after URL-encoding them.
- You can pass multiple parameters, but depending on text length or type, not all intended parameters may be preserved, so you must test.
- Keep them short and primarily alphanumeric. Avoid Korean characters or excessively long values.
- Always test that the intended parameters are retained after the service landing URL in the Kakao Talk in-app browser.
You can send messages through the Kakao Talk Channel Partner Center, Kakao Moment, or by developing a separate API. You can send targeted advertising messages based on Kakao Sync members' service usage history, messages encouraging non-members to sign up with Kakao Sync, and notification messages such as membership level updates.
See below for how to use each method.
If you upload a Customer file that includes service user IDs, you can extract only users who match your conditions and send targeted advertising messages.
If you register a Customer file based on customer information that your service holds, you can combine multiple conditions to create Friend groups and send more precise targeted messages.
The Customer file flow is as follows.
- Call the Create customer file API, or upload a Customer file manually.
- Create a Friend group.
- Send a targeted message to the Friend group.
If uploading a Customer file every time is inconvenient, you can integrate the API for automatic uploads. Whenever customer information changes, the Customer file can be updated automatically, and Friend groups created from that file can be refreshed together.
To integrate the API, complete the following.
- Connect a Biz app to a Kakao Talk Business Channel.
- Agree to the Customer Management API policy.
- After preparation, implement the Customer file API in Kakao Talk Channel > REST API.
You can upload a Customer file directly in Kakao Business. For automatic uploads, use the Create customer file API.
- Go to Kakao Business > [내 비즈니스(My Business)] > [메시지(Message)] > [고객 파일(Customer file)].
- Select [샘플파일 다운로드(Download sample file)] to download the sample CSV.
- Open the sample CSV and enter customer information held by your service (region, age, purchase amount, membership level, signup date, and more). See the Customer file input guide. You must enter either [앱유저아이디(App user ID)] or [전화번호(Phone number)], plus at least one item to use as a condition.
- When you finish entering data, save the file in CSV UTF-8 format.
- Select [1] [고객파일 업로드(Upload Customer file)] and upload the Customer file. Only
CSVfiles are supported. - Select [2] [저장(Save)]. After the upload is complete, the number of users among the uploaded users who can receive messages is displayed.
Kakao Talk Channel Customer file upload screen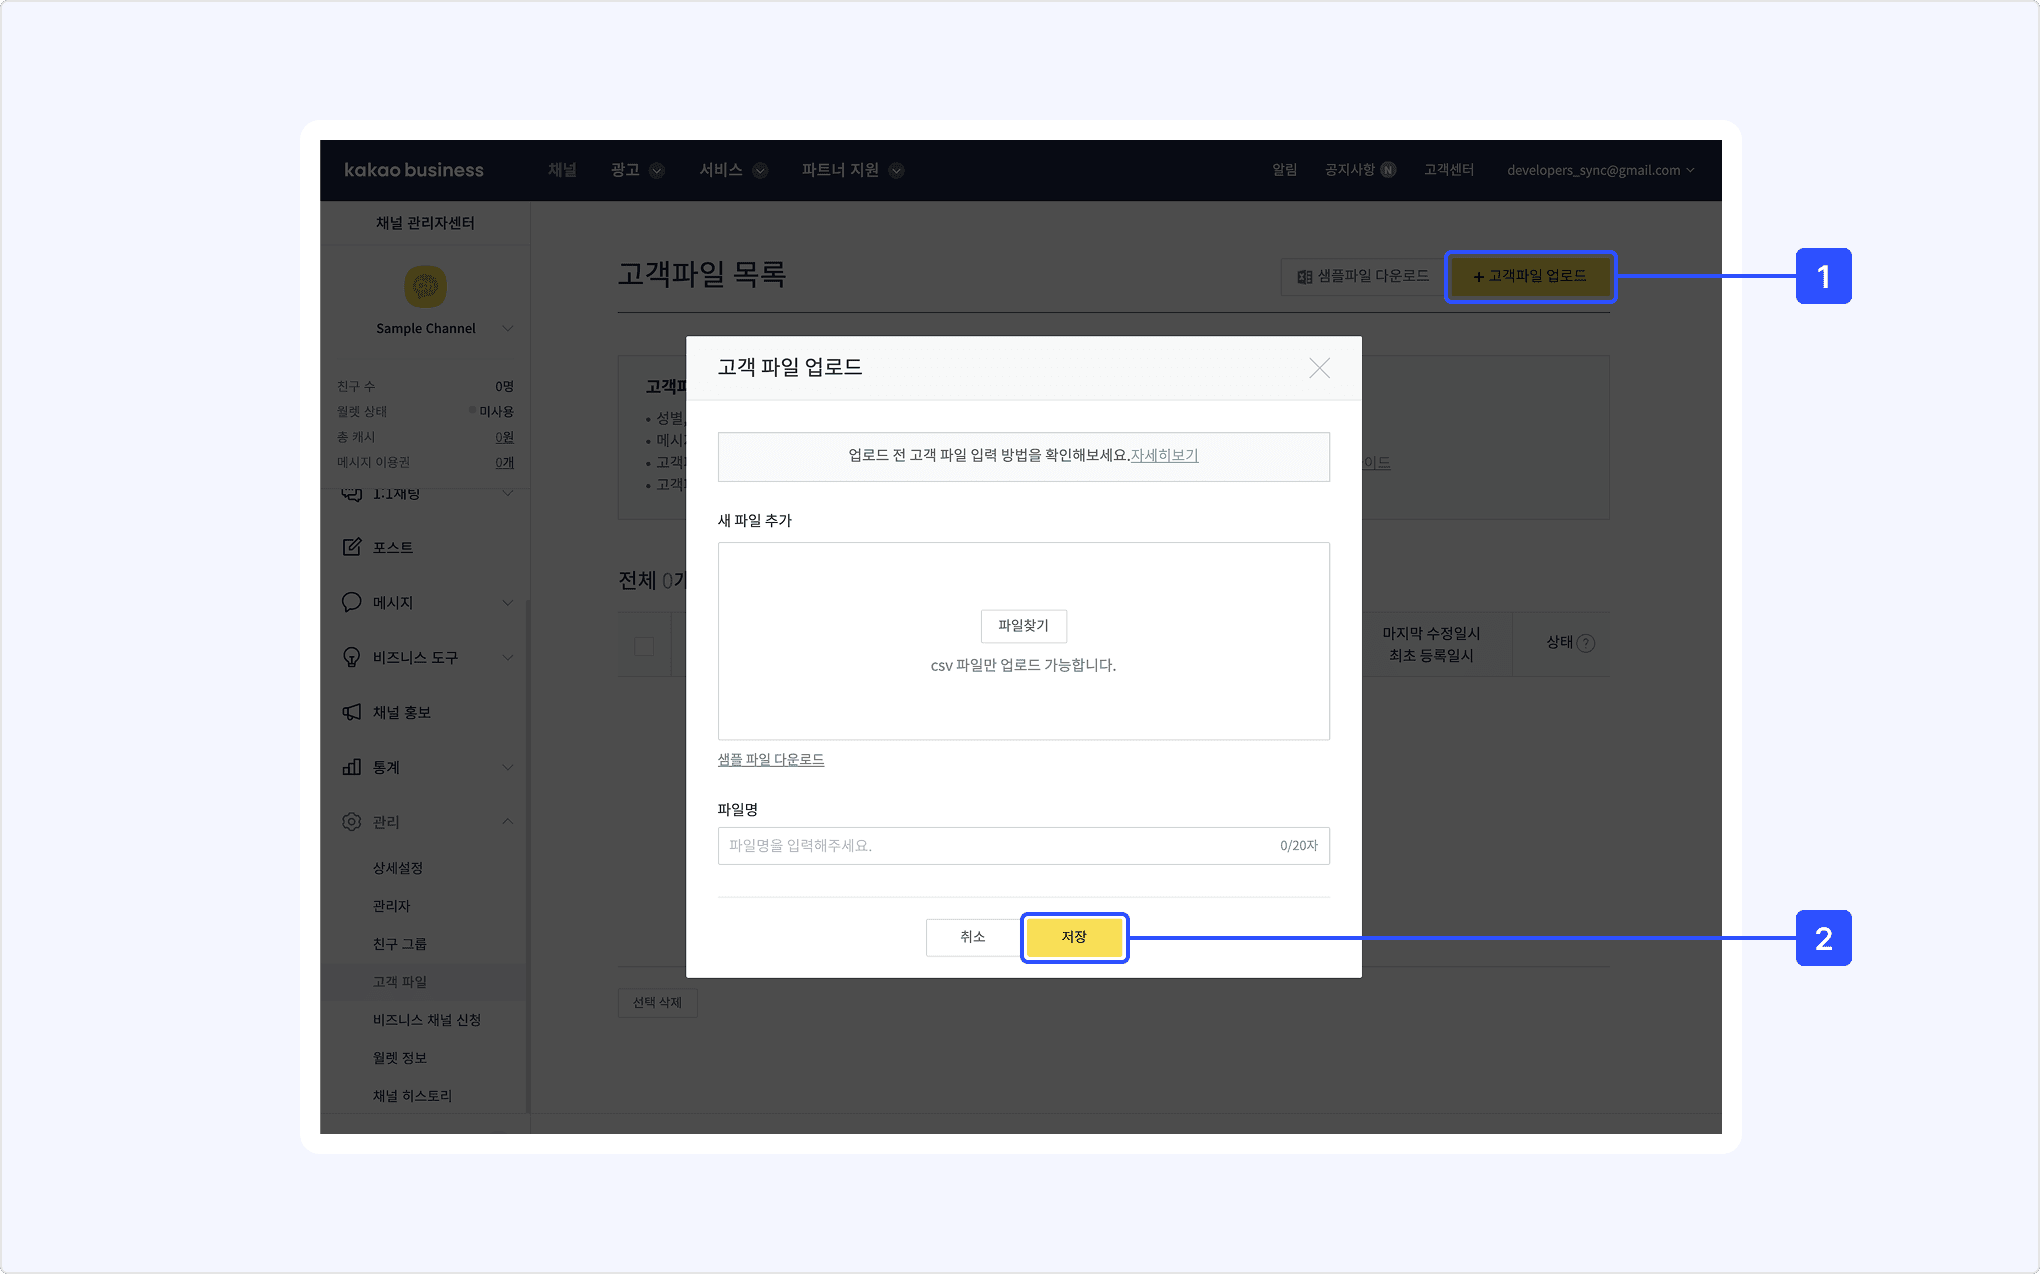
- In Kakao Business > [내 비즈니스(My Business)] > [메시지(Message)] > [친구그룹(Friend group)], select [신규그룹 만들기(Create new group)].
- Set [등록 수단(Registration method)] to [고객파일(Customer file)], then select the Customer file to use. For details, see the Business guide.
- In [고객파일 동기화 설정(Customer file sync settings)], select [ON] so that the Customer file and Friend group stay in sync.
- ON: Whenever the Customer file is updated, the linked Friend group is also updated in real time, and the registered count may increase or decrease. (Example: In a
Purchase amount of 10,000 KRW or moregroup, customer A is included automatically when their purchase amount becomes 10,000 KRW or more, and customer B is excluded automatically when it falls below 10,000 KRW). - OFF: Updates to the Customer file are not reflected in the linked Friend group.
- ON: Whenever the Customer file is updated, the linked Friend group is also updated in real time, and the registered count may increase or decrease. (Example: In a
- Select [다음(Next)].
- Add include and exclude conditions.
- Example: Set include conditions to
Has purchase history+Born in the 1980s+Female, and set exclude conditions to blacklist customers
- Example: Set include conditions to
- Select [저장(Save)] to create the new group.
Friend group creation screen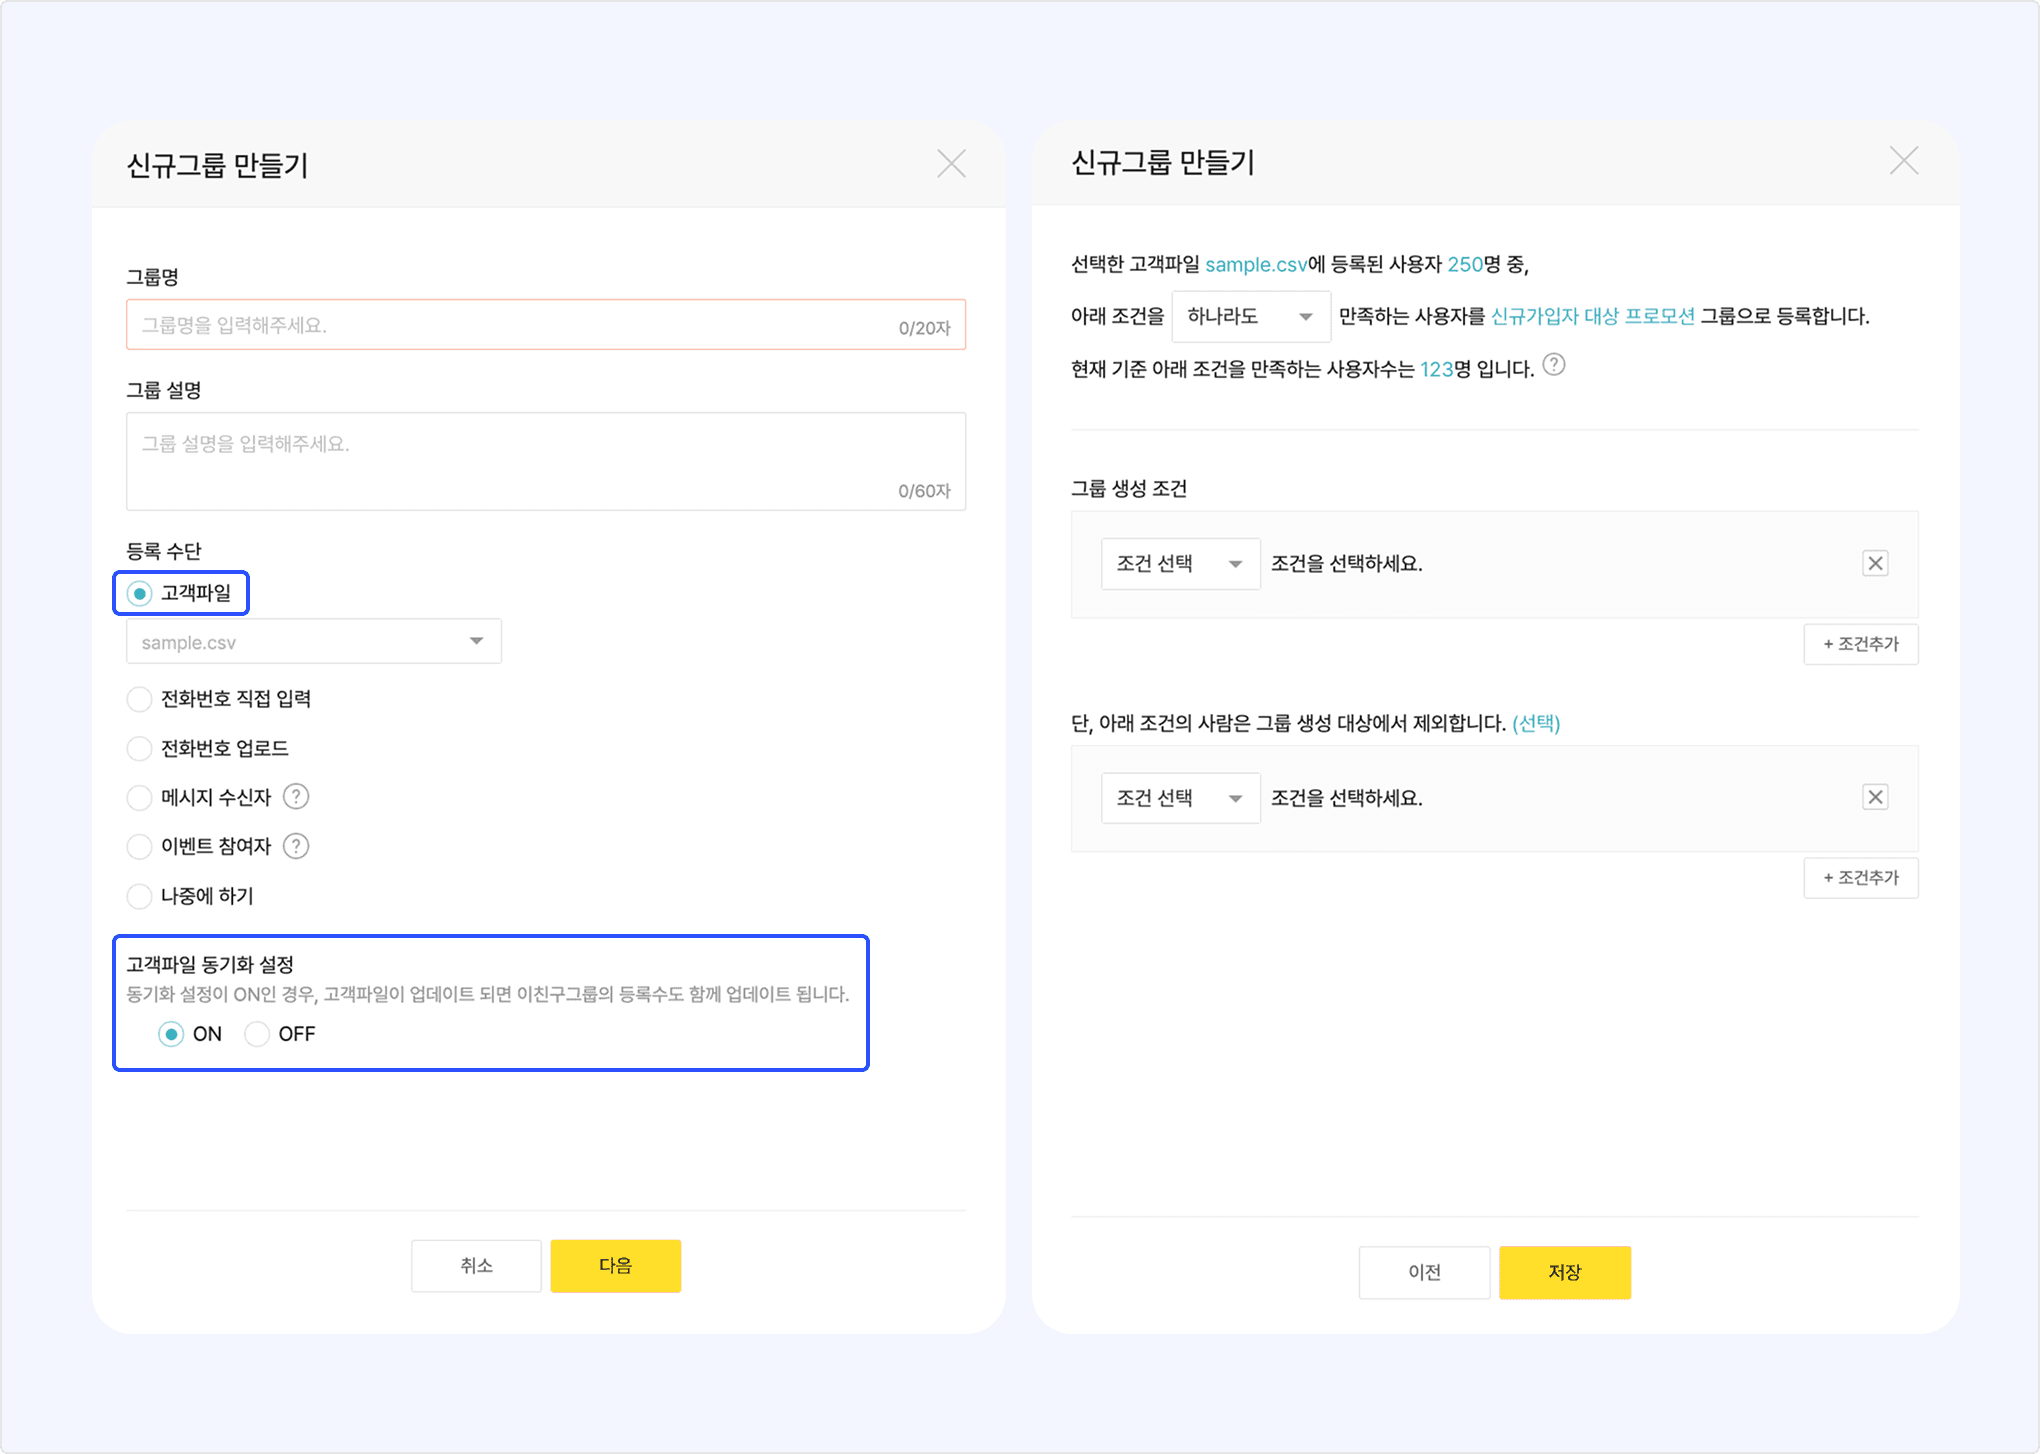
If you create Friend groups by combining various conditions, you can send more precise messages.
- Write a message in [메시지(Message)] > [메시지 보내기(Send message)]. (See Business guide > Write a message).
- On the message send screen, set [메시지 타겟 설정(Message target settings)] to [친구그룹 타겟팅(Friend group targeting)], then send the message. (See Business guide > Message send settings).
- After saving, when the status becomes
생성 완료(Creation complete), you can use it as a message send target. If there are many friends, the status may stay at생성 중(Creating) and take from a few minutes to several hours. We recommend finishing Customer file upload and Friend group creation 2 to 3 days before sending messages.
| Friend group condition example | Message example |
|---|---|
20s + Signed up within 30 days + Purchase amount of 50,000 KRW or more + Female | Here's a lipstick sample coupon for new members with a purchase amount of 50,000 KRW or more! |
30s + Male + VIP member + Seoul | Exclusive ultra-discount deals on new cars at all Seoul locations for VIP members only! |
When sending a channel message, you can load targets based on Kakao Talk Channel friends and Kakao Sync members. You can include or exclude Kakao Sync members and use basic targeting such as gender and age together. Use this in the Kakao Moment Partner Center.
If you have never used Kakao Moment, sign up with a Kakao Account and create an ad account. To send messages, the Kakao Account using Kakao Moment must be registered as an administrator of the Kakao Talk Channel.
Kakao Moment Friend group creation screen
- In [광고(Advertising)] > [타겟관리(Target Management)], select [1] [친구그룹 관리(Friend group management)].
- Select [+친구그룹 등록하기(Register Friend group)]. (See Business guide).
- Select the Kakao Talk Channel of the ad account.
- In [등록 유형(Registration type)], select [2] [앱유저아이디(App user ID)], then upload the file that contains service user IDs. Only
CSVfiles are supported. - After the upload is complete, the number of users among the uploaded users who can receive messages is displayed. Select [다음(Next)].
Kakao Moment Friend group view screen
When sending a message, go to [광고 만들기(Create an ad)] > [카카오톡 채널(Kakao Talk Channel)] > [맞춤타겟(Custom audience target)] > [내 데이터 설정(My data settings)] > [친구그룹(Friend group)] and load the uploaded group in the [친구그룹 조회(View Friend Group)] window. You can include or exclude only that group among all users who added your channel when sending a message.
You can send Biz Messages based on Kakao Sync service user IDs. Biz Message is an API service for sending personalized messages, real-time consultations, and customized advertising messages through a Kakao Talk Channel.
For details, see the Kakao Business pages below. To use these features, contact an official dealer contracted with Kakao.
- Info Talk: Send informational messages such as signup, service usage history, and membership level change notices.
- CS Talk: Provide 1:1 chat consultation by connecting users to customer support in Kakao Talk.
- Brand Pick message: Send customized advertising messages to potential customers based on interests.
If you also use Kakao Moment, you can run display ads targeted by whether users are Kakao Sync members. This uses the Kakao Talk Channel connected to your Kakao Developers app.
When displaying a display ad, you can target ads by distinguishing whether users are Kakao Sync members. You can also use Kakao Moment's basic targeting (gender, age, and more) together for the targeted users. However, Kakao Sync targeted ads can be displayed only on mobile.
If you are a partner who has installed Pixel & SDK, you can also distinguish only the Kakao Sync member audience among the full event audience by issuing a tag in the Pixel code.
Kakao Moment ad settings screen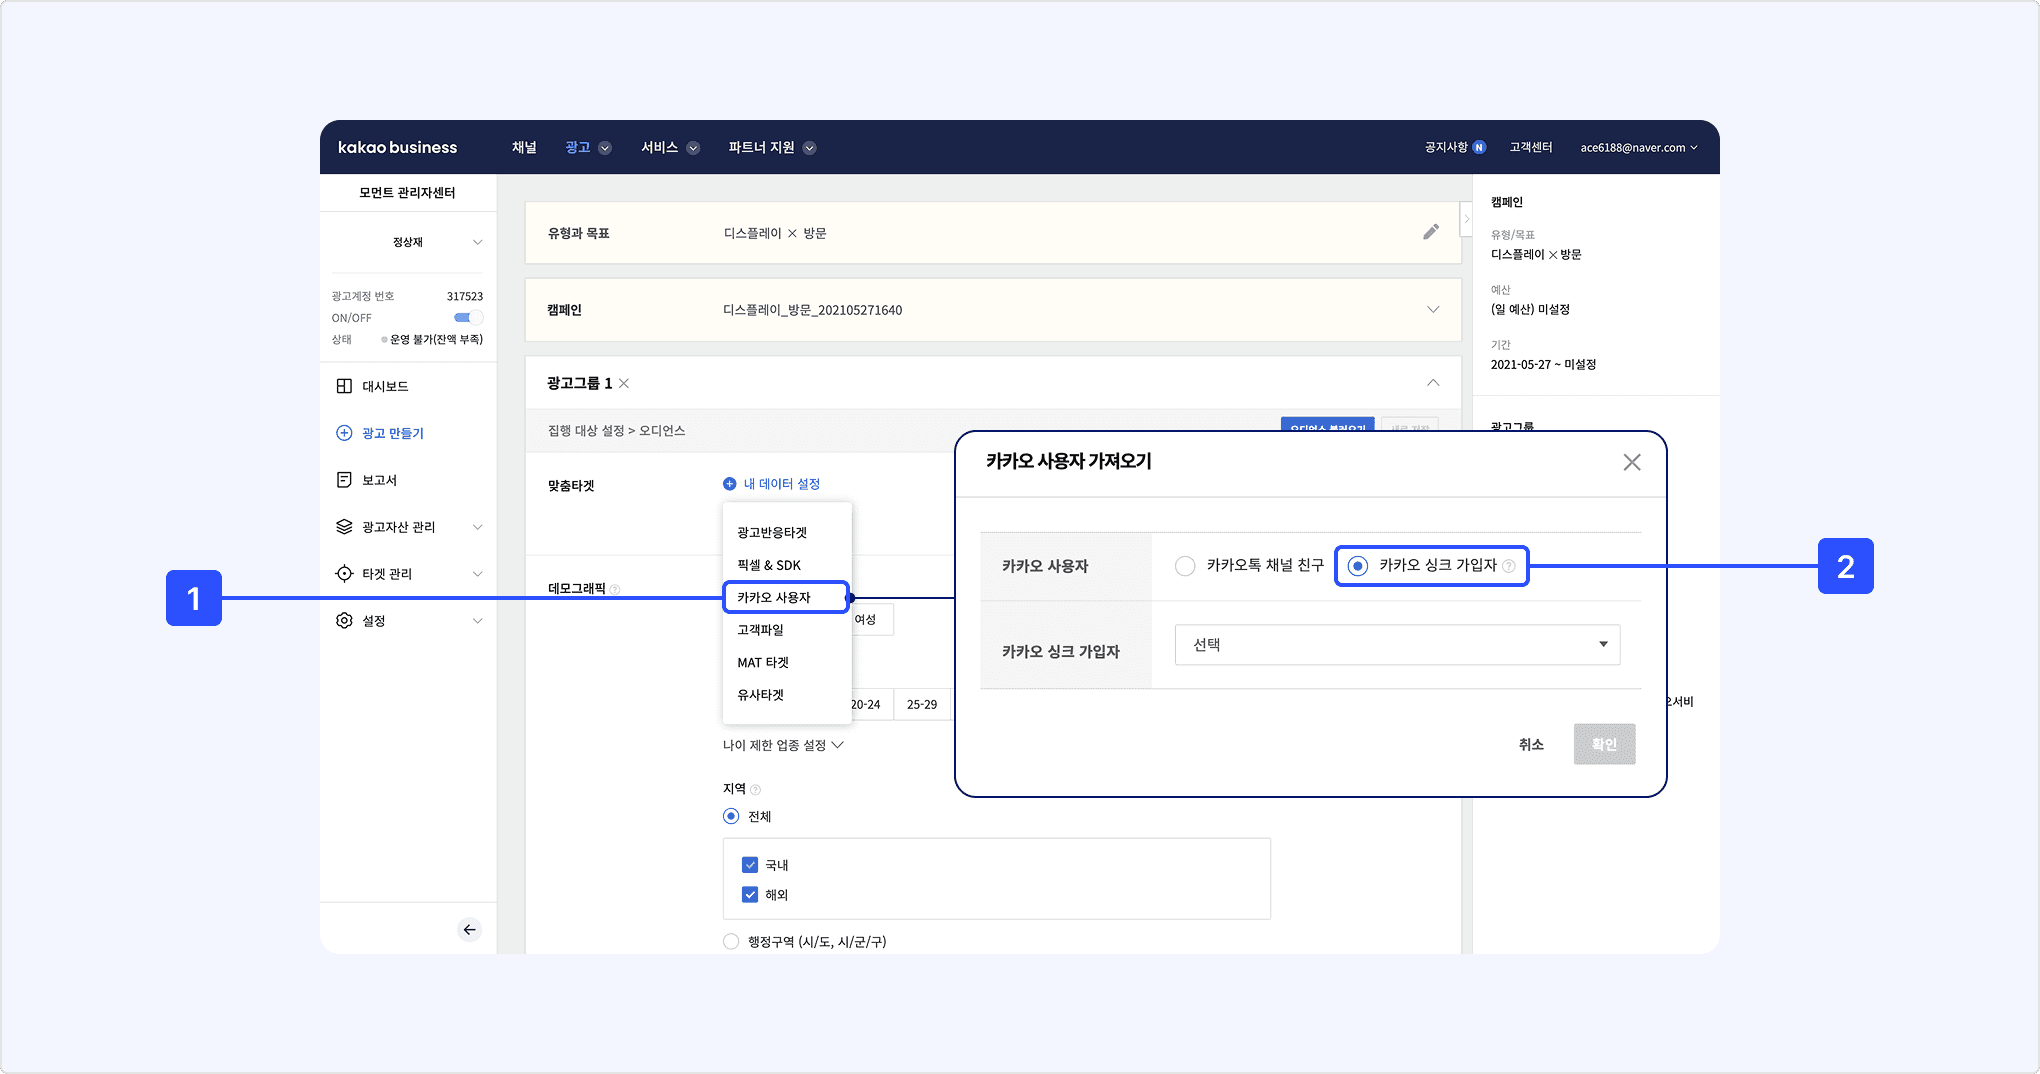
-
After creating an ad in [광고(Advertising)] > [광고 만들기(Create an ad)], select [1] [카카오 사용자(Kakao users)] in [내 데이터 설정(My data settings)].
-
In [카카오 사용자 가져오기(Get Kakao Users)], select [2] [카카오싱크 가입자(Kakao Sync members)], then select the Kakao Talk Channel displayed on the Kakao Sync Consent screen.
The Kakao Account using Kakao Moment must be registered as an administrator of the Kakao Talk Channel. For how to create an ad account, see Business guide.
Kakao Bizboard is an ad displayed at the top of the Kakao Talk Chat tab. With Kakao Bizboard, you can provide a Kakao Sync signup path inside Kakao Talk, and Kakao Bizboard also provides Kakao Sync signup data so you can easily check the number of members acquired through the ad.
How Kakao Bizboard brings in members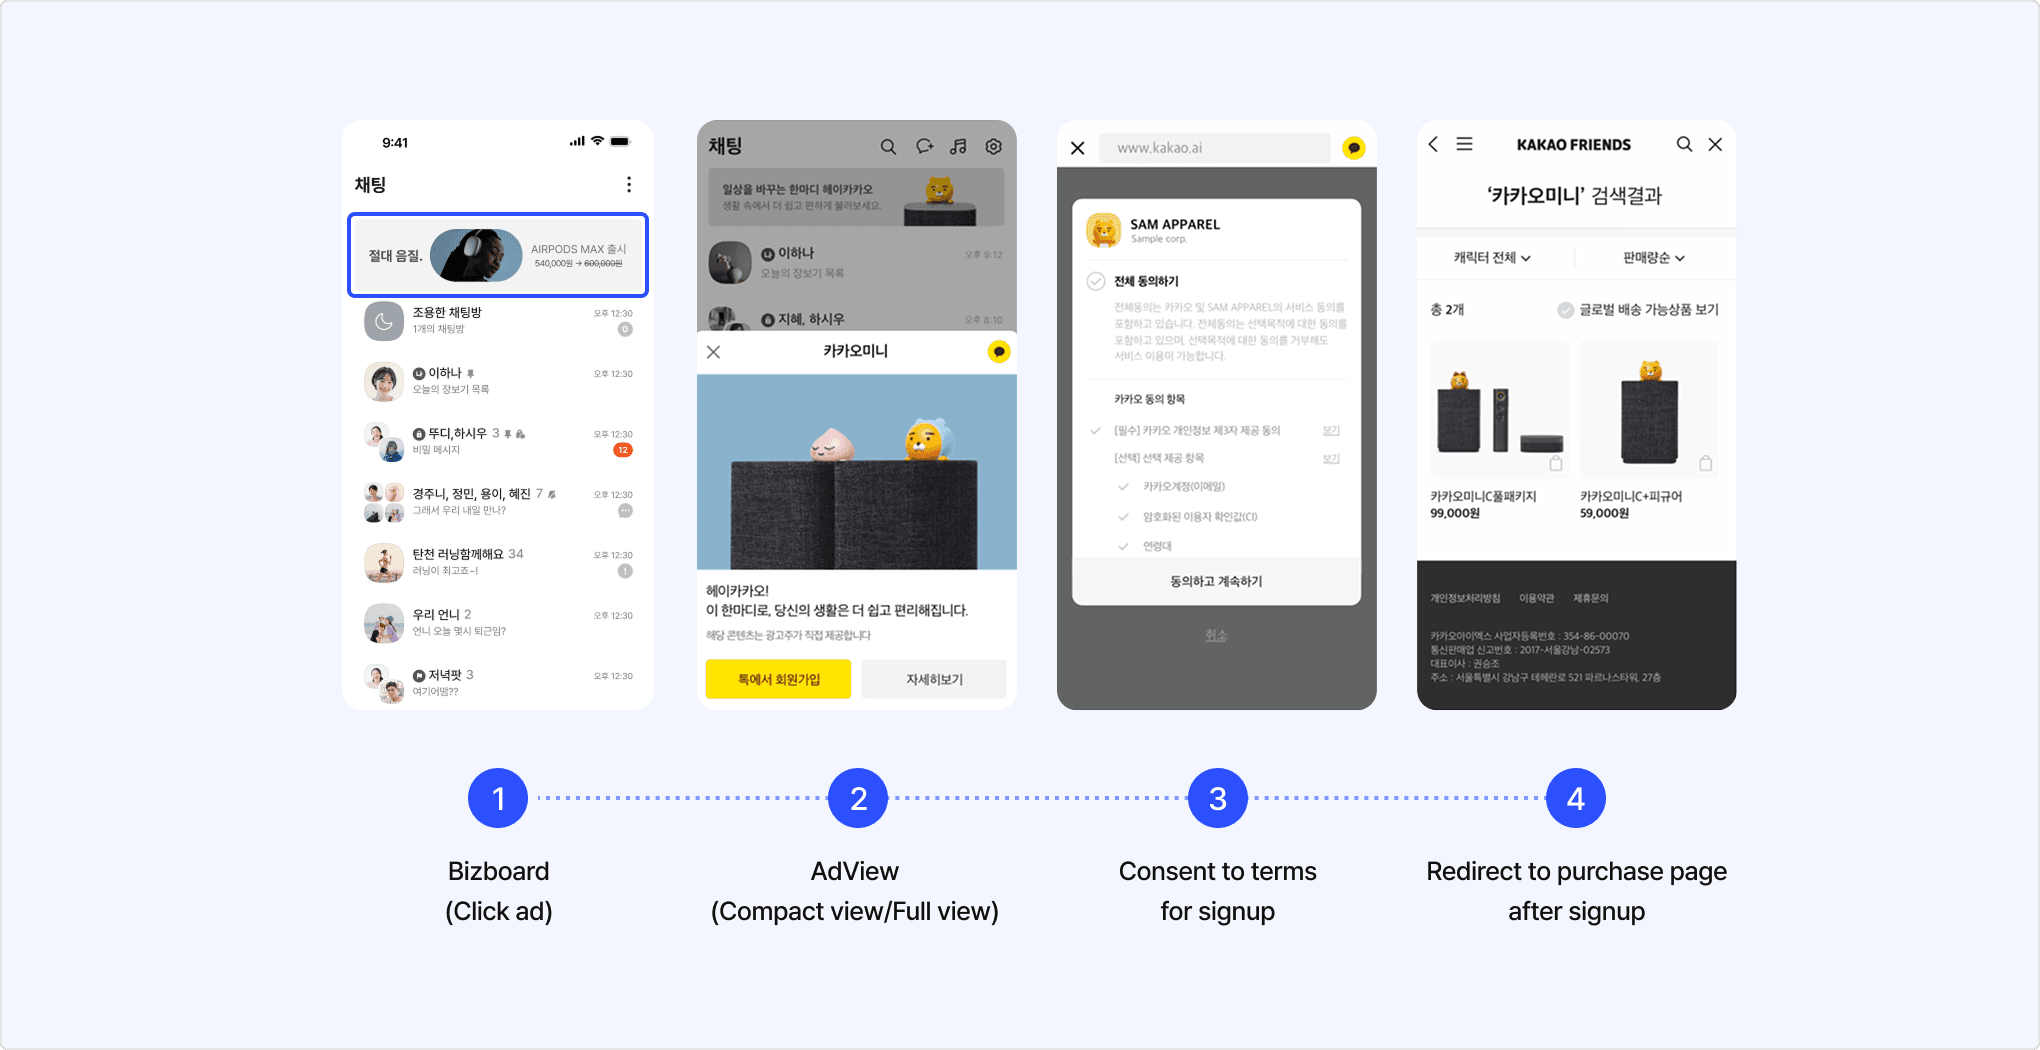
In Kakao Bizboard ads, AdView replaces the promotion page, so you must implement navigation to the Kakao Sync Consent screen immediately when the AdView button is clicked. Depending on your development method, additional work for user landing may be required.
See Development guide for whether to develop with the JavaScript SDK or REST API, and what to implement for each.
To create a Bizboard, see Business guide.