
This document provides information about an Kakao Developers app.
An app is a Kakao Developers project in which service information is registered. By configuring the app, a service can use the APIs and various features provided by Kakao Developers.
On the app management page, you can check and modify the basic information of the service that will use the Kakao API registered when creating Kakao Developers app in [App] > [General] > [App basic information].

[A] App icon: Service logo or app icon. File size must be under 250 KB; a size of 128×128 or less is recommended.
[B] App name (required): Service name.
[C] Company name (required): Business, corporation, or organization name operating your service.
[D] Category (required): The category that best fits your service.
[E] App primary domain: The primary domain of the service provided by the Kakao Developers app.
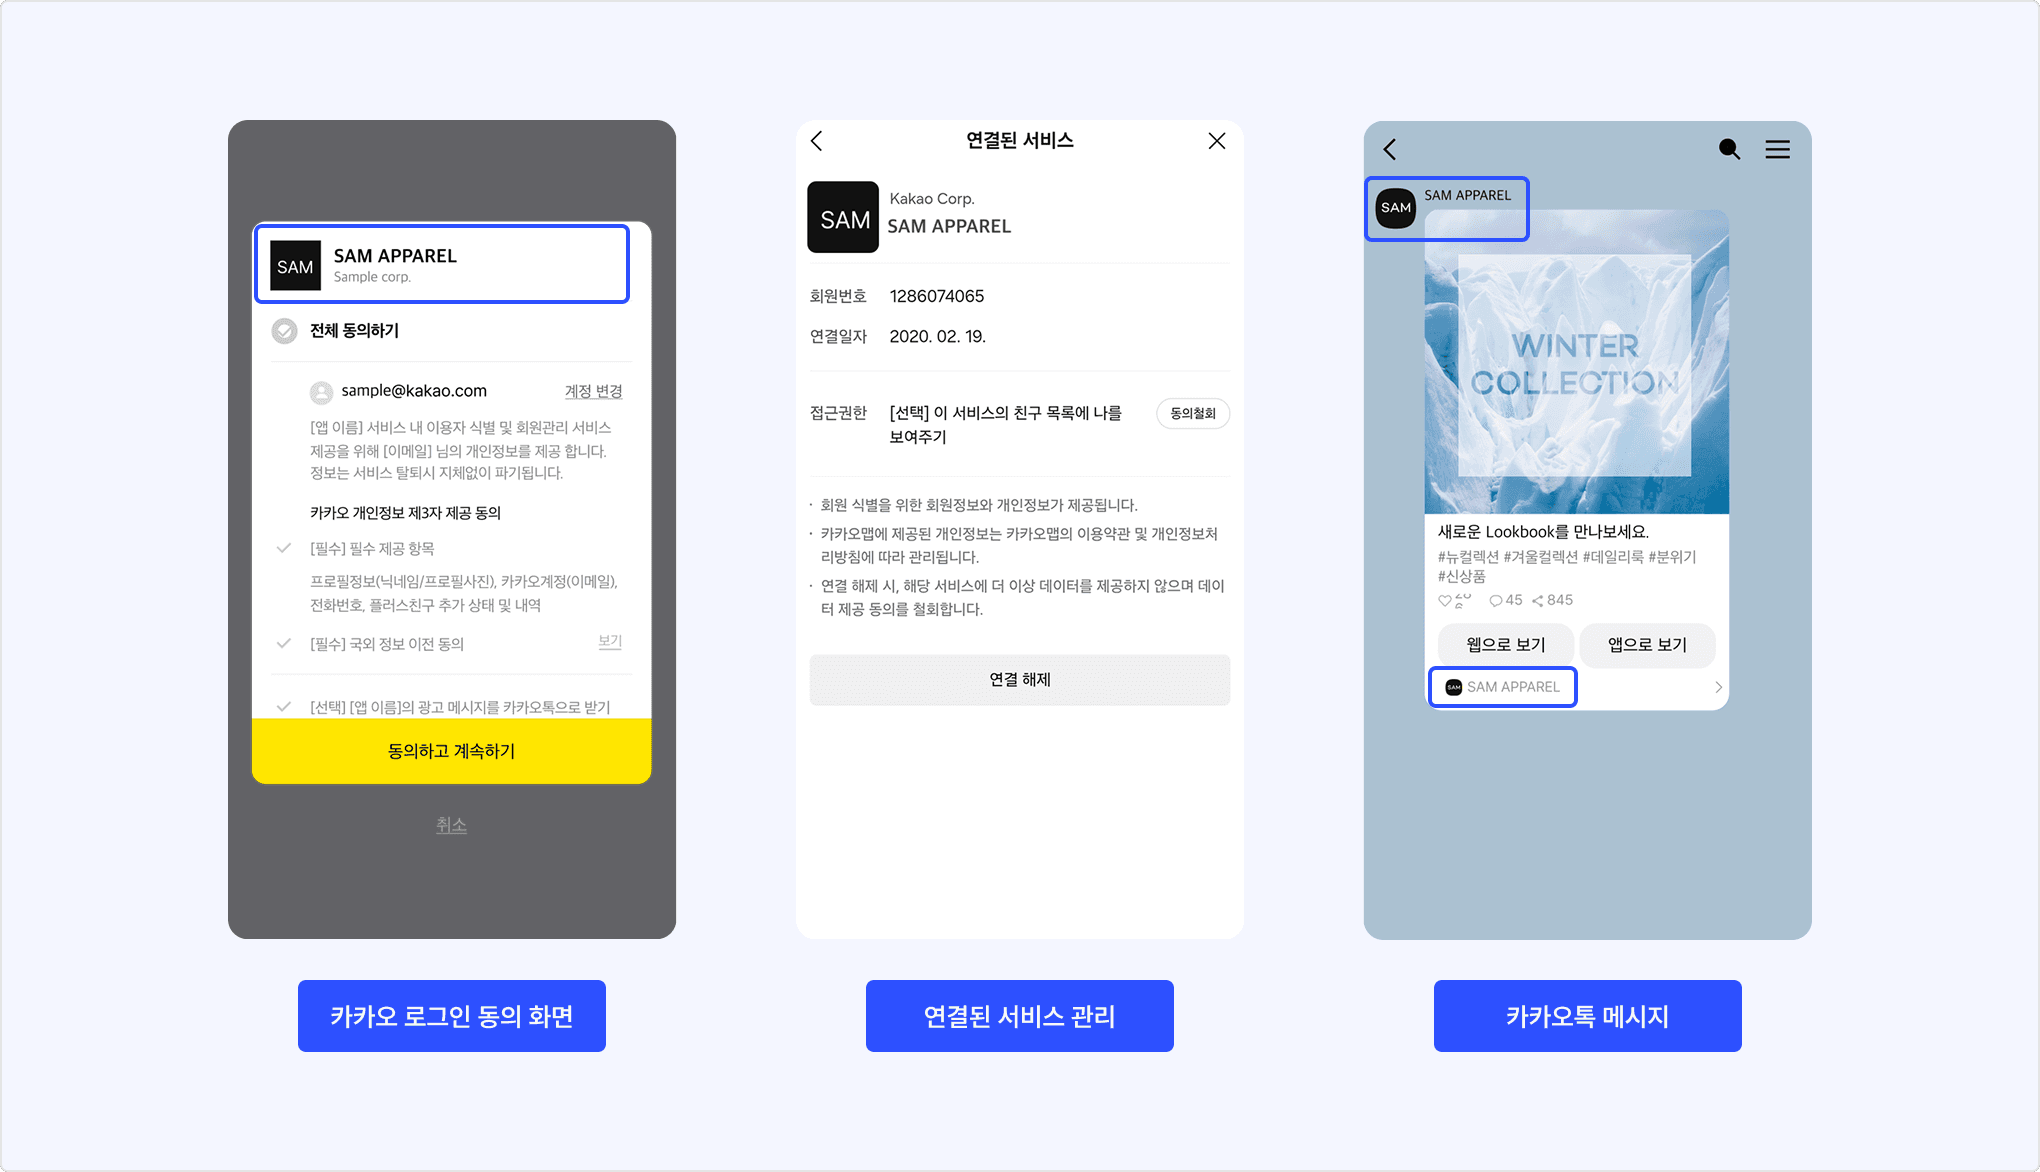
The basic information registered in the app is exposed to users, so you must enter the app information exactly as in the actual service. As shown in the image below, it is displayed on the Kakao Login consent screen, Manage Connected Services, and the source section at the bottom of Kakao Talk Messages.
You can check the app information at the top of the app management page and in the app list.

[A] App ID
[B] App classification
[C] Number of connected Kakao Talk Channels
[D] App name and icon registered when creating the app
[E] Member roles
A unique ID that identifies the app, which is assigned when an app is created. The app ID can be found at the top of the tools or on the app management page. When you make inquiries on DevTalk, share your app ID. Then, you can receive faster responses.
Kakao Developers apps are classified as follows, based on their permissions and status.
- Basic app: The initial status of an app with no special permissions granted (no label shown).
- Biz app: An app with registered business information.
- Test app: An app used for testing purposes.
- Blocked app: An app is blocked if the app or its owner violates the Kakao Developers Operation Policy. Note that if an owner’s account is blocked, all apps owned by that account are also blocked.
- Suspended app: An app that has not made any API calls or changes in app settings for the last 180 days. (See: Notice)
- You can select the app and reactivate it on the app management page.
Each service should have exactly one app. If you are already using Kakao Login or Kakao Talk Share, and thus have an existing app registered, continue using that existing app. Do not register a new one. If you lose access to the administrator account and cannot use the existing app, request an app owner change on DevTalk.
- If your service is already using Kakao Login and you create a new app, users will have to sign up again for the new app.
- This can cause issues, such as duplicate membership data being registered for the same user.
On the app management page, you can register the service's business information in [App] > [General] > [Business information] to switch to Biz app.
A Biz app is an app with registered business information, providing the following additional features.
- Available to connect to a business channel of the same business registration number in [App] > [Request additional features] on the app management page
- Available to set the consent item [Email] as a required consent
- Available to set subdomains
- Available to use Kakao Sync
- Available to use the Retrieve a list of Kakao Talk friends API
- Available to use Kakao Talk Message APIs
- Available to Request for app permissions
In [App] > [General] > [Business Information], select [Register business information] to register your business information. The app must have an app icon registered, and only the app Owner can register. Register the applicable number below depending on your business type.
- Domestic business (Korea): Business registration number
- Overseas business (outside Korea): D-U-N-S number
Individual developers without a business registration number or D-U-N-S number should refer to Switch to a Biz app for an individual.
A unique 9-digit number assigned by Dun & Bradstreet (D&B) used to identify overseas businesses. Business information for overseas businesses is reflected based on the information registered with the D-U-N-S number. If you need to update your information, update the information registered with D&B first, then contact us via DevTalk.

The Biz app is also available for individuals, celebrities, or governmental entities without a business registration number. If the app meets the guidelines below, it can be switched to a Biz app in [App] > [General] > [Business information] on the app management page.
- The app's OWNER must complete the user identification process on [Account settings] at the top right side of Kakao Developers
- Consent to Terms and Conditions of Use for Kakao Business.
A Biz app for individual developers cannot be connected to a Business Channel because it lacks business information. If you need to adopt Kakao Sync, you can still register business information in [App] > [Business Information] even after converting to a Biz app for individual developers.
The test app is provided for updating or adding a new feature to the service. The test app has built-in permissions to preview features before requesting a review. Belows are the main features that the test app provides
- Additional features for test apps to preview features before submitting a review of the original app
- Available to use independent test app settings that differ from the original app settings
- Permissions are automatically applied to the test app when permissions are added or deleted to the original app (Ex: Kakao Business privacy review or separate permissions for APIs, such as Kakao Social, Messages, and Talk Calendar)
Consider the limitations below when using test apps.
- Creation and deletion
- Only the Biz app can create the test app.
- Up to 5 apps can be created per original app.
- Deletion of an original app is not possible if it has test apps.
- Team management
- At the time of initial creation, the OWNER and team members of the test app are the same as those of the original app.
- When the OWNER of the original app is changed, the test app OWNER is also changed, and the test app OWNER cannot be changed separately.
- Team members of the test app, excluding the OWNER, can be added or removed independently of the original app.
- A separate maximum team member limit is applied.
- Feature usage
- Additional features provided for testing can be used.
- Only team members of the test app can use the test app.
- For the below products, APIs that require permissions can only be called by the team members of the test app, even if the original app has acquired the permissions. The response range is also limited to those team members.
- Kakao Talk Message, Kakao Talk Social, Talk Calendar.
- A separate quota limit is applied.
- Make sure that the test app is not applied to the actual service.
- Test apps are provided only for testing purposes, so a limited quota is applied, and use for purposes other than testing is penalized.
Below is the complete list of permissions provided for the default test app. To use additional permissions in the original app, you need to obtain the permissions separately by reviewing.
- Basic features and permissions of the app
- Additional features and permissions for the Biz app
- Available consent type in the Personal information (provide additional required or optional consent permissions)
- Email (
account_email): Required - Name (
name): Optional, Required - Gender (
gender): Required - Age range (
age_range): Required - Birthday (
birthday): Required - Birthyear (
birthyear): Optional, Required - Phone number (
phone_number): Optional, Required - Shipping information (recipient name, shipping address, phone number) (
shipping_address): Optional, Required
- Email (
- Kakao Login: Set Simple Signup
- Kakao Login: Retrieve shipping address
To create a test app, go to [App] > [General] > [Test App], and select [A] [Create a test app].
You can access the settings page for the test app by selecting the [B] name of the test app from the [Test App] list.
The test app has its own app key, independent settings, and exclusive permissions, separate from the original app. For the policies that apply to test apps, see Limitations.

If the app is no longer needed or if you have been guided to delete your Kakao Developers app on another platform, you can delete it as follows.
- Select the app you want to delete from [App].
- Go to [App] > [General] > [App deletion], and click [Delete app permanently].
- Enter the App name of the app to delete, then click [Delete].
- When an app is deleted, its users can no longer use the features provided by Kakao Developers through APIs.
- A deleted app cannot be restored.
An app cannot be deleted under the following conditions.
- You are not the app Owner (OWNER).
- The app is connected to a Kakao Talk Channel.
- A test app is in use.
- A Biz Wallet is connected.
- The app is being used with Kakao Sync integration on an e-commerce platform.
This section explains how to configure Kakao Developers app keys. App keys are provided as platform keys and Admin keys.
Platform keys (REST API key, JavaScript key, Native app key) and the Admin key are values that must be included to authenticate the service app information when calling Kakao APIs. Kakao Developers authenticates the service’s API requests using the app information associated with the app keys. For the details on each app key, see each section below.
After creating an app, the service must register its information for each app key. App keys can be managed in [App] > [Platform key] and [App] > [Admin key] on the app management page.

[A] Add Admin key: When selected, navigates to the [Add key] page for each app key.
[B] Displays summary information of the registered key. Click it to go to the Key settings page. The copy button allows you to copy the key value.
[C] Primary key badge.
[D] Key management menu.
- Select [A] [Add Admin key] to move to the [Add key] page.
- On the [Add key] page, enter the service information and select [Save] to add a key. You can add up to five keys for each key type.
- If you need to register five or more keys, contact DevTalk.
This section explains how to edit settings, set as primary key, clone key, and delete an app key using the key management menu.
- Select a row of the key to update in [B], or select [Edit] in [D] to move to the [Edit key] page.
- On the [Key settings] page, edit the settings and select [Save] to update the key settings.
This section explains how to create a clone key, which you can use when a key may have been exposed and needs to be replaced, or when you need a key that reuses the existing key settings as-is.
- Select [D] of the row of the original key, and select [Clone key]. A clone key is added with the same settings as the original key but with a different key value. You can add up to five keys for each key type.
- Select [D] icon of the clone key, and select [Edit]. Change [Key name] to a value that is easy to identify.
- Creating a clone key does not automatically deactivate the original key.
- If you created a clone key to replace an existing key, you must manually delete the original key.
When Kakao Developers needs to use one of the service’s keys to provide a feature, it uses the primary key. Some APIs must be requested using the primary key.
When an app is created, one key of each type is registered as the primary key by default, and you can add keys and change which one is the primary key. See below for the list of features where Kakao Developers uses the primary key.
- REST API key
- Kakao Sync Easy setup.
- Authentication key for the Kakao Sync setup result webhook.
- Authentication key for the Account status change webhook.
- When chatbot features (Kakao Sync Plugin, Biz Plugin, Personal information usage plugin, etc.) must perform authentication such as Kakao Login or API requests.
- JavaScript key
- Kakao Sync Easy setup.
- Authentication key for the Kakao Sync setup result webhook.
- Native app key
- Default native app scheme.
- Initial preset value of the native app scheme when creating a Custom template.
- Admin key: Authentication key for the Webhook provided by Kakao Developers.
When calling an API that requires the default key with a regular key, the following error occurs.
- Changing the primary key may cause errors in running services.
- Check the impact in advance and take any necessary actions before changing the primary key.
- In [D] of the row of the key to delete, select [Delete] to remove the key.
- You cannot delete a key in the following cases. Refer to the relevant guide to change the designated key to another one, and then try again.
- When there is only one key for each platform key type or the Admin key, or when the key is set as the primary key.
- When the key is a Native app key designated as the default native app scheme in Product Link.
- When the key is a Native app key designated as the [Native app scheme] in [Tools] > Message template.
If the registered platform key information does not match the actual service, the invalid android_key_hash or ios_bundle_id or web_site_url error occurs. Check the main registration fields for each platform below and register values that match the actual service.
- JavaScript key: JavaScript SDK domain.
- Native app key:
- Android: Package name, Key hash.
- iOS: Bundle ID.
If the app key registration information differs from the actual service, an invalid android_key_hash or ios_bundle_id or web_site_url error occurs. Check the key registration items for each platform below and register values that match the actual service.
- JavaScript key: JavaScript SDK domain.
- Native app key
- Android: Package name, Key hash.
- iOS: Bundle ID.
If you request an API that must be called with the primary key using a general key instead, the below error occurs. When this error occurs, send the request again with the correct primary key value that you can check in [App] > [Platform key] or [App] > [Admin key].
If you request an API that must be called with the Platform key using an Admin key, the below error occurs. When this error occurs, send the request again with the correct key value that you can check in [App] > [Platform key].
This value must be included to authenticate the service app information when calling Kakao APIs via REST APIs. For the details on adding and managing keys and primary keys, see Platform key.

[A] REST API key: Displays the REST API key value, and allows copying the value with the copy button.
[B] Key name: Name used to identify the key.
[C] Allowed IP address: Registers IP addresses allowed to make requests with the REST API key.
[D] Redirect URI: Registers redirect URIs required when using Kakao Login or Business Authentication.
[E] Client secret: Allows configuring whether to use the feature and managing codes. The feature is enabled by default when a key is created.
[F] Additional information: Displays the activation status, creation date, and last modified date of the REST API key.
- For service security, the REST API key (including the key automatically created with the app) is added with the Client secret feature enabled by default.
- Therefore, you must include the
client_secretparameter in your token issuance requests. - If necessary, you can disable this feature.
Client secret is a mechanism where tokens for Kakao Login and Business Authentication can be issued only when a specific code issued by Kakao Developers is included in the request. See the configuration method below.

[A] Generate / Reissue / Delete: Generates, reissues, and deletes Client secret codes.
[B] Code: Displays the issued Client secret code, and you can copy the value using the copy button.
[C] Activate: Selects whether to enable the Client secret feature ([ON]: enabled, [OFF]: disabled).
- Select [A] [Generate] for the product to which you will apply the Client secret feature (Kakao Login or Business Authentication), then select [Save] at the bottom right to issue the code. The issued code is displayed in [B] [Code].
- Apply the value of the issued [B] [Code] to your service.
- Change [C] [Activation] to [ON] and select [Save] to activate the Client secret feature.
- Remove the Client secret code applied to your service.
- Change [C] [Activate] to [OFF], then select [Save] at the bottom right to deactivate the Client secret feature.
- Select [A] [Delete] and select [Save] to delete the issued code.
- Change [C] [Activate] to [OFF], then select [Save] at the bottom right to deactivate the Client secret feature.
- Select [A] [Reissue code] and select [Save] to issue a new Client secret code.
- Apply the new Client secret code to your service.
- Change [C] [Activate] to [ON] and select [Save] to reactivate the Client secret feature.
- When you delete or reissue a Client secret, the previous code cannot be restored.
- All token issuance requests using the previous Client secret will fail, so extra caution is required for running services.
This value must be included to authenticate the service app information when using the web doamin of Kakao SDK for JavaScript or Kakao SDK for Flutter. For the details on adding and managing keys and primary keys, see Platform key.

[A] JavaScript key: Displays the key value and status, and allows copying the value with the copy button.
[B] Key name: Name used to identify the key.
[C] JavaScript SDK domain: Registers website domains allowed to use Kakao SDK for JavaScript.
[D] Redirect URI: Registers redirect URIs used when requesting Kakao Login with a JavaScript key.
[E] Additional information: Displays the activation status, creation date, and last modified date of the JavaScript key.
Register the website domains where Kakao SDK for JavaScript can be used with the JavaScript key. The JavaScript key can be used only on registered JavaScript SDK domains and requests from other domains are rejected. The following rules apply when registering domains.
- You can register up to 10 domains.
- If you need to register more domains, contact DevTalk.
- You can register domains in the
http://,https://, andfile://formats.- If you register either
httporhttps, both protocols can be used.
- If you register either
- You can register domains that include wildcard subdomains.
To register domains required for web links in Kakao Developers products, you can set them in [App] > [Product Link] > [Web domain] on the app management page.
This value must be included to authenticate the service app information when using the native platforms of Kakao SDK for Android, Kakao SDK for iOS, or Kakao SDK for Flutter. For the details on adding and managing keys and primary keys, see Platform key.

[A] Native app key: Displays the key value and status, and allows copying the value with the copy button.
[B] Key name: Name used to identify the key.
[C] Package name: Android app package name.
[D] Store URL: Android store URL.
[E] Key hash: Android key hash.
[F] Bundle ID: iOS bundle ID.
[G] Store URL: iOS store URL.
[H] Scheme: Native app scheme (custom URL scheme) issued for the key.
[I] Additional information: Displays the activation status, creation date, and last modified date of the Native app key.
This is the unique identifier of an Android app. It is a required value when registering Android app information, and Kakao SDK for Android can only be used by native apps whose package names are registered. The package name can be found in the package attribute of the AndroidManifest.xml file in the Android project (Example: com.kakao.developers).
This is the unique identifier of the Android app certificate (signing key) and is used by Kakao Developers to verify that the service app is a trusted target. It is a required value when registering Android app information, and Kakao SDK for Android can only be used by native apps whose key hashes are registered. For the details, see Key hash and register key hashes for each development environment.
This is the unique identifier of an iOS app. It is a required value when registering iOS app information, and Kakao SDK for iOS can only be used by native apps whose bundle IDs are registered. The bundle ID can be found in the Xcode settings of the iOS project under [Target] > [General] > [Identity] as the Bundle Identifier value.
Messages sent via Kakao Developers products can include links that launch the service app. If the service app is not installed on the user’s device when opening such a link, the user is redirected to the registered store URL. See the platform-specific rules for entering store URLs below.
- Android: When the package name is entered, the Google Play Store URL is automatically filled. If needed, you can select [Enter manually] or [None].
- iOS: Select [Add (+)] on the right to enter App Store URLs separately for iPhone and iPad.
The admin key is an authentication key with administrator privileges for a service app, and only the app owner can view and manage its value. It is used when requesting APIs that use the Admin key authentication method and access sensitive settings or resources among the Kakao APIs.
To prevent exposure, the Admin key must be used only on the server and must not be included in client-side source code. For the details on adding and managing keys and primary keys, see Platform key / Admin key.

[A] Admin key: Displays the Admin key value and status, and allows copying the value with the copy button.
[B] Key name: Name used to identify the key.
[C] Available APIs: Specifies APIs that can be called with the Admin key.
[D] Allowed IP address: Registers IP addresses allowed to make requests with the Admin key.
[E] Additional information: Displays the activation status, creation date, and last modified date of the Admin key.
Specify the scope of APIs that can be called with an Admin key. The full list of APIs that can be specified is available in Admin key: API category.
By specifying available APIs, you can restrict unnecessary permissions in the production environment or separate specific features so that they are called only from a dedicated server. Set one of the three items below to configure the scope.
| Setting item | Allowed target | Usage example |
|---|---|---|
| [All APIs allowed] | Allows calling all Admin key: API category. | Use this for early development stages or internal environments. |
| [Only specific APIs allowed] | Allows calling only selected APIs among Admin key: API category. | Use this when you want to separate and control sensitive APIs. |
| [All APIs allowed except specific APIs] | Allows calling all Admin key: API category except the selected APIs. | Use this when only a few APIs require exceptions. |
If you call an API that is not designated as an Available API for the Admin key, the below error occurs. When this error occurs, designate the API to be called with the admin key in [App] > [Admin key] > [Available API] on the app management page, then send the request again.
You can register Web domain and Native app scheme that are allowed for links included in Kakao Developers products provided via APIs, such as Kakao Talk Share, Kakao Talk Message, and Talk Calendar, in [App] > [Product Link] on the app management page. Links within Kakao Developers products are allowed only when the information is registered in [Product Link].
You can add domains that allow web link connections included in Kakao Developers products and select a default web domain. The service can assign one of the registered web domains to each product’s web link to allow link connections.
Domains required to use Kakao SDK for JavaScript can be registered in [App] > [Platform key] > [JavaScript key] > [JavaScript SDK domain] on the app management page.

[A] Manage web domains
[B] Select default domain
[C] Web domain information: Displays key information of the registered web domains
This section explains how to register, edit, and delete web domains and the rules to follow.
-
Register: When selecting [A] [Register domain], the [Add web domain] window opens. Select [Add (+)] to add input field, enter the domain, then select [Save] to register it. The following rules apply when adding a domain.
- You can add up to 10 domains.
- Any path included in the entered domain is excluded, and only the domain is registered.
- Example: If you enter
https://www.example.com/mypage, it is registered ashttps://example.com.
- Example: If you enter
- Rules for registering domains that include wildcard characters (
*) apply.- Cannot be added as the first domain, and can be added only after another domain has been registered.
- Cannot be selected as the default web domain.
-
Edit: After a domain is registered, [A] [Register domain] changes to the [Edit domain] button, and you can edit registered domains by selecting this button.
-
Delete: Select [A] [Edit domain] to open the [Edit web domain] window, and then select [Delete (-)] for the domain to delete. The following rules apply when deleting a domain.
- The default web domain cannot be deleted.
- When the web domain applied to the Custom template web link is deleted, it is replaced with the default web domain.
This section explains how to configure web domains for web links in Kakao Developers products. For the details, see each product document.
- Register the desired domains by registering or editing web domains.
- In each product’s web link settings, you can select one of the registered web domains. (Initial value: default web domain.)
- The selected domain is set as a domain where link connections are allowed.
The default web domain is applied as the initial value of the web domain that allows web links in Kakao Developers products. See the configuration method and examples below.
- Configuration
- The first web domain you add is automatically designated as the default web domain.
- After adding web domains, you can change the default by selecting [B] [Select default domain].
- Kakao Talk Share and Kakao Talk Message usage examples
- Initial web link value for Link settings when creating a Custom template.
- When you change the default web domain, the web link settings of each product that uses this domain are also changed.
- This may cause errors where links cannot connect, so you must check the impact and take necessary actions before making changes.
You can view custom URL scheme that allow app link connections included in Kakao Developers products and select a default native app scheme. The service can assign one of the registered native app schemes to each product’s app link to allow link connections.

[A] Select default app scheme: See Default native app scheme.
[B]: Displays registered native app schemes (custom URL scheme).
This section explains how to add, edit, and delete native app schemes.
- Add and edit: In [App] > [Platform key] > [Native app key] on the app management page, you can add new keys or edit existing keys and register native app information for the service to add or edit schemes.
- Delete: In [App] > [Platform key] > [Native app key] on the app management page, deleting a registered key deletes the associated native app scheme.
This section explains how to configure native app schemes for app links in Kakao Developers products. For the details, see each product document.
- In [App] > [Platform key] on the app management page, add a Native app key and register native app information for the service.
- In each product’s app link settings, you can select one of the registered schemes. (Initial value: default native app scheme.)
- The selected scheme is set as a scheme where link connections are allowed.
The default native app scheme is applied as the initial value of the native app scheme that allows app links in Kakao Developers products. See the configuration method and examples below.
- Configuration
- The scheme of the first added Native app key is automatically designated as the default native app scheme.
- After adding a Native app key, you can change the default by selecting [A] [Select default app scheme].
- Kakao Talk Share and Kakao Talk Message usage examples
- Sent with a default template: The default native app scheme is automatically applied to app links.
- Sent with a custom template: Used as the initial value of the native app scheme field and as the initial value of app links in the link settings.
- When you change the default native app scheme, the app link settings of each product that uses this scheme are also changed.
- This may cause errors where links cannot connect, so you must check the impact and take necessary actions before making changes.
Request a review to use additional features of the app. The list of additional features that can be applied for can be found in Request permission.
Request a review on the app management page at [App] > [Request additional features]. Before applying for additional features, complete Check eligibility. Refer to the instructions for each item below.
For information on checking the Kakao Talk Channel list and disconnecting, see Connected Kakao Talk Channel.

[A] Check eligibility
[B] Business information
[C] Additional features
On the app management page, go to [App] > [Request additional features] to check the app and account's qualifications to request app permissions.
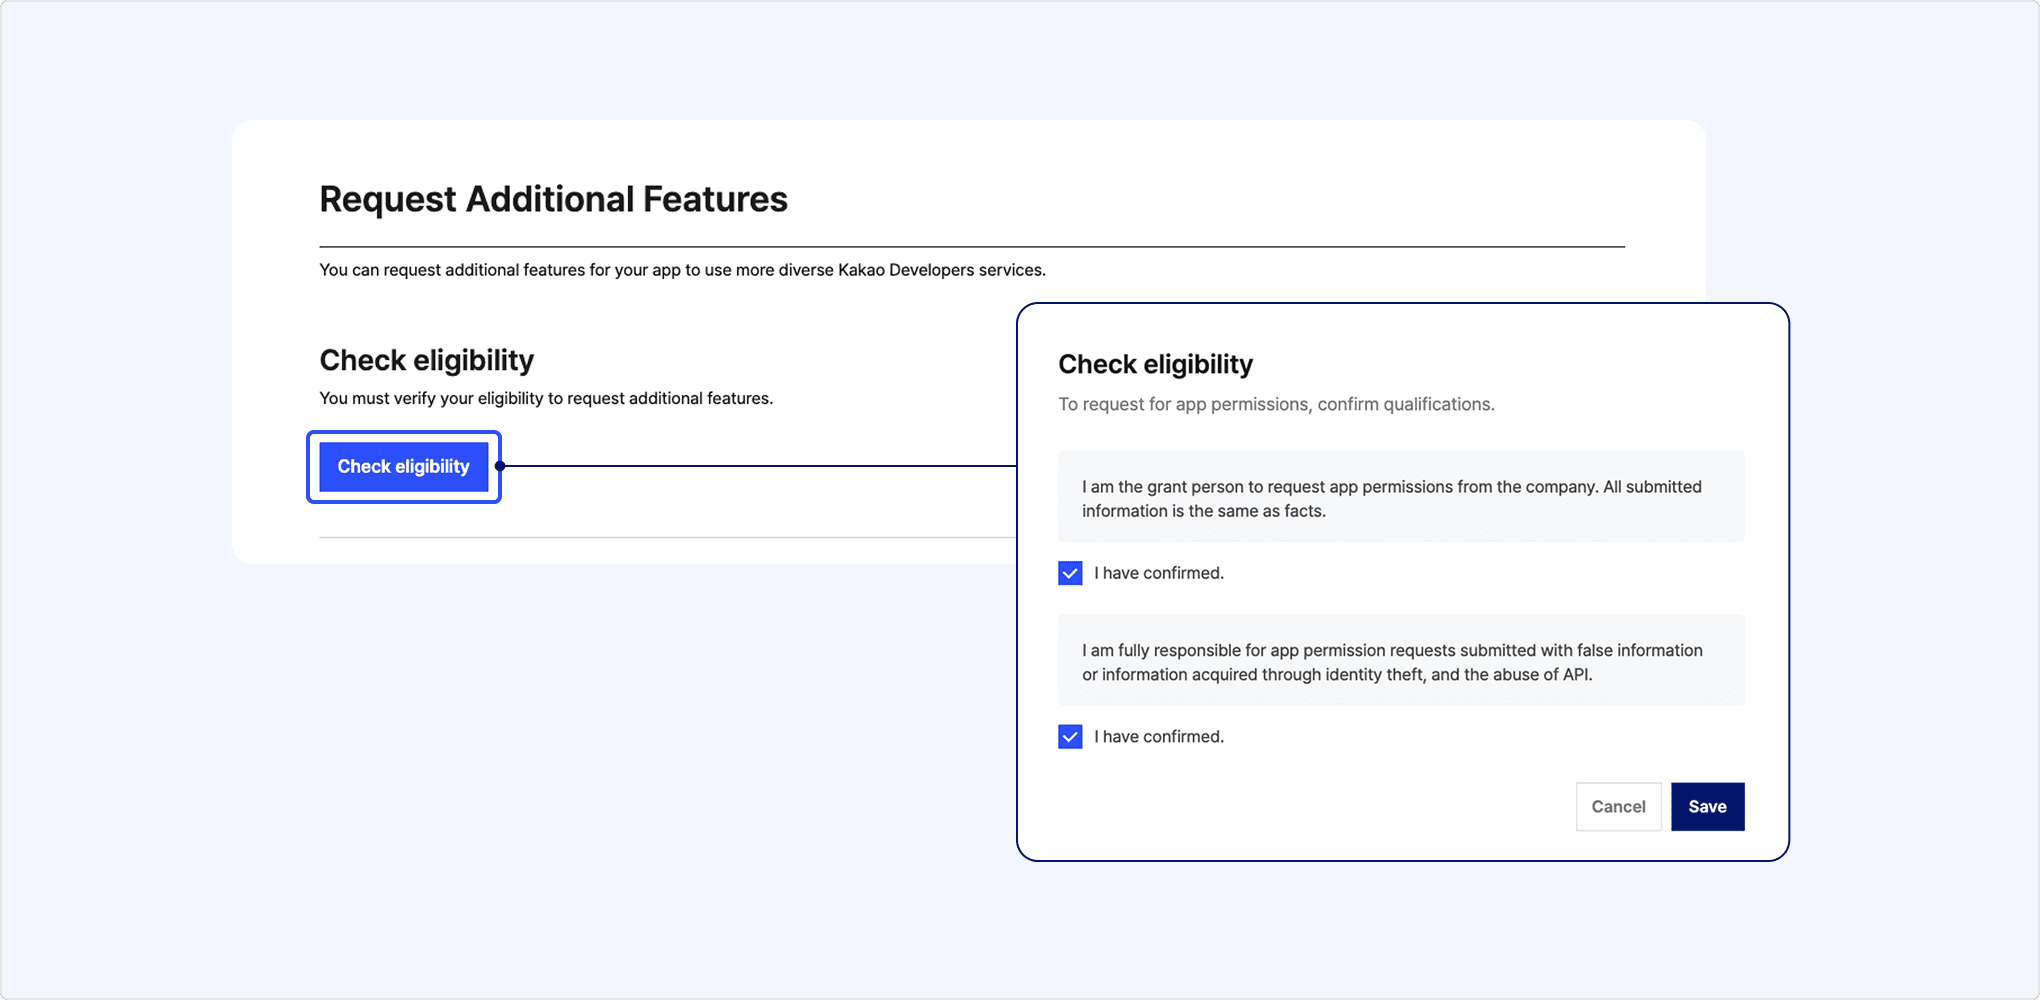
- If you do not meet the Conditions for checking eligibility, guidance related to [A] Check eligibility will be displayed. Follow the instructions to configure your app or account.
- If you meet the Conditions for checking eligibility, a [Confirm Qualifications] button will appear under [A] Check eligibility. Click this button to open a window for checking eligibility.
- After reviewing and agreeing to the details, the check eligibility will be completed.
- Owner or Editor role: The access account requires app OWNER or EDITOR role.
- Identity verification: If the identity verification is not incompleted, follow the instructions to verify your identity.
- Biz app: If the app is not a Biz app, swiching to a Biz app is required. (See Biz-app)
On the app management page, go to [App] > [Request additional features] to request business information verification for the app. You can request it after completing Check eligibility.
- Business verification is available after Check eligibility. Until then, the [Request] is disabled.
- When selecting [Request] for [B] Business information, the [Business information] input window opens.
- Fill in the inputs by referring to the instructions and cautions for each item, and request.

On the app management page, go to [App] > [Request additional features] to request a review for your app to use additional features. You can find the features you can request in the Request additional features list.
- Additional feature review can be requested only after Check eligibility is completed. Before that, [Request] in the [C] Additional features list is deactivated.
- When you select [Request] in the [C] Additional features, the review request window opens. If you attempt to request a feature that requires Business information review before it is completed, the business information review window opens first. After submitting the business information review, you can proceed to request the additional feature review.
- Fill in and submit the input fields with reference to the guidance and cautions for each item. You can check the review status in the [Review status] column, and the approval or rejection of the requested review will also be sent to the email registered with the account.
Displays the status of the permission review as below.
- In progress: The review has been requested and is currently being reviewed by a staff member.
- Approved: The request has been approved and the app has been granted permission.
- Partially approved: The request has been partially approved and the app has been granted part of the permission.
- Rejected: The request was not approved and the app was not granted permission, need to resubmit with deficiencies.
- Already approved: Permission to use the corresponding additional feature is already granted.
If you have any questions regarding the request for additional features, contact us through the [추가 기능 신청] (meaning 'Additional feature request') board or by message on DevTalk. For swift response, include your App ID when making an inquiry.
You can use Kakao Talk Channel connected to your Kakao Developers app for marketing purposes. For the method to connect the app and Kakao Talk Channel, see Connect Kakao Talk Channel to app.

[A] Connected Kakao Talk Channel
[B] Primary channel
[C] Customer management API policy agreement
You can check and manage the list of Kakao Talk Channels connected to the app.
Click [Manage Kakao Talk Channel] to navigate to the Request additional features page. To connect the app and Kakao Talk Channel, click [Request] in the [Connect Kakao Talk Channel] column to request a connection. To disconnect, select [Disconnect] in the [Connection Management] section.
For how to connect a Kakao Talk Channel, see Connect Kakao Talk Channel to app.
You can check the list of Kakao Talk Channels connected to the app and select [Disconnect] if needed to disconnect them. Disconnected Kakao Talk Channels can be reconnected by selecting [Request] for [Connect Kakao Talk Channel] in [App] > [Request additional features] on the app management page.
If you are using Kakao Sync as a hosting service for your shopping mall, you cannot disconnect the channel with this feature. You need to refer to the hosting company instructions that supports the Kakao Sync Simple Settings popup, and change your hosting company's admin settings.
A primary channel is the Kakao Talk Channel that represents your service. When a primary channel is set, the consent item for adding the channel is displayed on the consent screen. To see how to set, see Primary channel.
You can agree to the required policies to use the Kakao Talk Channel customer management API. See the step-by-step guide below.
- Connect Kakao Talk Channel to the app.
- In the app management page, select [App] > [Kakao Talk Channel] > [Customer management API policy agreement], then select [Agree] to open the guide window. Only the app Owner account can agree to the policy.
- After reviewing the information notice about user personal information protection and management responsibility in the guide window, select [Save] if you agree with the content.
- Refer to Developer documentation and call the API. For details about the Kakao Talk Channel customer management API, see Kakao Talk Channel customer management.
Register settings related to webhooks to receive notifications about user activities or account status changes that occur outside the service. For the details, see Webhook.
If webhook testing is required, select [Webhook test] for simple testing. For the details, see Webhook test.
On the app management page, go to [App] > [Webhook] > [Account status change webhook], then select [Register webhook] to configure the Account status change webhook. Enter the detailed information with reference to the descriptions below.

[A] Activation status: Select [Enabled] to enable Account status change webhook.
[B] Webhook URL (required): Enter the webhook URL of your service that receives change event information, only HTTPS is supported and only port 433 can be registered
[C] Change Event: Select Change event types of each category.
[a] Categories: Select a desired category. Provided only to the app with permission.
[b] Types: Select desired change event types.
After entering the detailed information, select [Save] to display the registered webhook details. Select [Edit] to modify the registered information, or select [Delete] to remove it.
These settings alone do not activate the webhook feature. You must also implement a server that can process webhook requests. For more details, see Implementation steps.
On the app management page, select [App] > [Webhook] > [Unlink webhook], then select [Register webhook] to configure the Unlink webhook. Enter the detailed information with reference to the descriptions below.

Enter the domain address, method, and request path (Path) for processing webhooks in the [Webhook URL] field. Only HTTPS is supported for webhook URLs to protect user information, and only port 443 can be registered.
After entering the detailed information, select [Save] to display the registered webhook details. Select [Edit] to modify the registered information, or select [Delete] to remove it.
The webhook will not operate with only these settings. A receiving server capable of processing webhook requests must also be implemented. For the details, see Implementation steps.
- If your server does not respond to webhook requests for a long period of time or if the error rate is high, the Kakao API server no longer delivers webhooks and change its status to [Deactivated].
- Read email, web push notifications sent to your app team members. After resolving the issue, set the activation status back to [Active] to resume webhook delivery.
On the app management page, select [App] > [Webhook] > [Kakao Talk Share webhook], then select [Register webhook] to configure the Kakao Talk Share webhook. Enter the detailed information with reference to the description below.

Enter the domain address, method, and request path for processing webhooks in the [Method] and [Webhook URL] fields. Only HTTPS is supported for webhook URLs to protect user information, and only port 443 can be registered.
After entering the detailed information, select [Save] to display the registered webhook details. Select [Edit] to modify the registered information, or select [Delete] to remove it.
The webhook feature will not operate with only these settings. A receiving server capable of processing webhook requests must also be implemented. For the details, see Implementation procedure. In addition, the Kakao Talk Share webhook can only be received after Custom parameter configuration are completed.
The Kakao Talk Message API returns the message send result in the response, so a separate webhook feature is not required.
On the app management page, select [App] > [Webhook] > [Kakao Talk Channel webhook], then select [Register webhook] to configure the Kakao Talk Channel webhook. The Kakao Talk Channel webhook can be configured after connecting Kakao Talk Channel to the app.

Registering a [webhook URL] alone does not activate the webhook feature. A receiving server capable of processing webhook requests must also be implemented. For details, see Implementation procedure.
When a webhook is implemented, the webhook is sent to all business Kakao Talk Channels connected to the app. You can check the target Kakao Talk Channels in [App] > [Kakao Talk Channel] > [Connected Kakao Talk Channel] on the app management page.
A member is a person who manages the app. You can manage members in the [App] > [Member] section of the app management page. Only developer accounts registered as members can view or modify app information, and for a test app, only members can call Kakao APIs.
- Owner
- Holds all configuration permissions for the app. (See List of app settings available only to the Owner.)
- Editor
- Holds all app configuration permissions except for the items in List of app settings available only to the Owner.
- Message Editor
- Can view app information and register or update message templates.
- Viewer
- Can only view app information.
- Delete app.
- Delete Platform key.
- Admin key: Check key value, add key, create duplicate key, update settings, delete.
- Change Primary key.

-
[A] Add member
- [Kakao Account (email)]: Enter the email address of the developer account to invite and select the permission to grant.
- Only email addresses used for Kakao Account login can be invited as members. An email is sent to the address upon invitation.
- Kakao Account can be registered on the Kakao Account page.
- [Role]: Select the member role to grant to the invited developer account.
- [Kakao Account (email)]: Enter the email address of the developer account to invite and select the permission to grant.
-
[B] Member information and management
- Kakao Account: Kakao Account email of the member.
- Role: Role granted to the member.
- State: Member state.
- Active: User who has completed Kakao Developers registration and member registration.
- Invitation email sent: User who has not registered for Kakao Developers yet. Can join as a member after receiving the invitation email and completing registration.
- Dormant: User whose Kakao Account is dormant. The Kakao Account email of the dormant user is not exposed to any member, including the owner. Dormant members cannot be edited and can only be removed.
- Management
- Provides the ability to modify or remove member permissions.
- The owner can select [Edit] to change the role for each member (including transferring owner permission to another member) or select [Delete] to remove a member.
- A member can select [Leave] to remove themselves from the member list.
Only one developer account can be the Owner of an app. To change the Owner for app settings available only to the Owner, follow the steps below.
- Log in with the developer account that owns the app.
- On the account management page, go to [App] > [Member] > [Add member], and add the developer account to become the new app owner as a member.
- To use a new Kakao Account, register a new Kakao Account, log in to Kakao Developers, and complete developer registration.
- In the member list, select [Edit] and change the permission to Owner.
If the app Owner is unknown or missing, refer to FAQ.
For services in operation, this setting may affect the behavior of features that use the Kakao API. Use it only after fully understanding the details below.
This feature configures the Kakao API server to allow requests only from registered IP addresses as a safeguard against security incidents such as key leakage. When the feature is enabled, Kakao API requests can be made only from the registered IP addresses.

[A] IP address input field. Use the [Add (+)] or [Delete (-)] buttons to add or remove entries.
Allowed IP addresses can be configured for REST API key and Admin key respectively. This setting is applied separately based on the key used for API requests.
- Add IP address and enable the feature: Enter the IP address to allow in [A] [IP address input field], then select [Save] at the bottom right. The IP address is registered, and the allowed IP address feature is enabled. The following rules apply when registering allowed IP addresses.
- Up to 10 addresses can be registered.
- Registration using CIDR (IP/CIDR) or Subnet Mask (IP/Mask) is recommended; individual IPs (IPv4) can also be registered.
- Modify IP address: Enter the updated IP address in [A] [IP address input field] for the registered IP, then select [Save].
- Delete IP address: Select [C] [Delete IP address] for the IP to remove, then select [Save] to delete it from the list.
- Disable the feature: Delete all registered IP addresses and select [Save] to disable the allowed IP address feature.
If a Kakao API request is made from an unregistered IP address, the following error response is returned. To resolve the issue, add the IP address of the requesting service server or delete all registered IP addresses.
To use Kakao Login or Business Authentication, a redirect URI must be registered. The redirect URI is a key element of the authentication process based on OAuth 2.0, and redirection is allowed only to a pre-registered URI.

[A] Redirect URI input field. Use the [Add (+)] and [Delete (-)] buttons to add or remove entries.
The platform key on which a redirect URI must be registered varies depending on the product and call method. Refer to the guidance below.
- Kakao Login
- REST API: Register the Kakao Login redirect URI in the REST API key.
- JavaScript SDK, Flutter SDK: Register the Kakao Login redirect URI in the JavaScript key.
- Business Authentication
- REST API: Register the Business Authentication redirect URI in the REST API key.
- Add redirect URI: Enter the redirect URI to use in [A] [Redirect URI input field], then select [Save] at the bottom right to register it. The following rules apply when registering redirect URIs.
- Up to 10 can be registered (for additional registration, contact DevTalk).
- Only HTTP and HTTPS protocols are supported, and each must be registered separately if necessary.
- Arbitrary parameters cannot be included in the path.
- Domains containing wildcard characters can be registered.
- Modify redirect URI: Enter the updated URI in [A] [Redirect URI input field] for the registered URI, then select [Save].
- Delete redirect URI: Select [Delete (-)] for the URI to remove, then select [Save] to delete it.
If the redirect URI is incorrect, a KOE006 error occurs during the authentication request. Check that the registered redirect URI exactly matches the redirect URI sent in the request.
A Biz app can register domains containing wildcard characters. The following rules apply when registering such domains.
- If only domains containing wildcard characters are registered, some features may not work properly.
- Each domain must include a unique domain name or host name.
https://*.sample.com(O).https://*.com(X).
- A wildcard character cannot be placed in the middle of the domain.
https://*.sample.com(O).https://sub.*.sample.com(X).
- A domain cannot contain more than one wildcard character.
https://*.sample.com(O).https://*.*.sample.com(X).